Wood Siding Repair A Practical Guide
Wood siding repair: It’s a task that might seem daunting, but with the right knowledge and approach, it becomes manageable. This guide walks you through everything from identifying the type of damage to your siding to selecting the appropriate repair method and preventing future problems. Whether you’re dealing with minor cracks, rot, or insect damage, we’ll equip you with the information you need to tackle the job successfully, saving you time, money, and potential headaches down the line.
We’ll cover various wood siding types, their strengths and weaknesses, and how to assess the extent of damage. From there, we’ll dive into practical repair techniques, including step-by-step instructions for common repairs and advanced solutions for more serious issues. We’ll also discuss preventative maintenance strategies to keep your siding looking its best and lasting for years to come. Get ready to learn how to protect your home’s exterior and boost its curb appeal!
Types of Wood Siding
Choosing the right wood siding for your home involves understanding the various types available and their respective properties. Different woods offer varying levels of durability, maintenance needs, and aesthetic appeal, impacting both the longevity and the overall look of your house. Selecting the appropriate siding depends on your budget, climate, and personal style preferences.
Several common wood siding types are used in residential construction. These differ significantly in their density, grain patterns, natural resistance to rot and insects, and their cost. Understanding these differences is key to making an informed decision.
Common Wood Siding Types and Their Characteristics
Let’s examine some of the most popular wood siding options and their key features. This information will help you assess which type best suits your needs and budget.
| Siding Type | Material | Durability | Aesthetic |
|---|---|---|---|
| Cedar | Western Red Cedar, Eastern White Cedar | High natural resistance to rot and insects; long lifespan with proper maintenance. | Rich reddish-brown tones; straight grain; classic and elegant appearance. Can be left natural or stained/painted. |
| Redwood | Coast Redwood | High natural resistance to rot and insects; very durable and long-lasting. | Varied reddish-brown tones; often has a more rustic appearance than cedar. Can be left natural or stained/painted. |
| Pine | Various pine species (e.g., Southern Yellow Pine) | Moderate durability; susceptible to rot and insect damage if not treated properly. Requires regular maintenance and protective treatments. | Light to medium brown tones; often knotty; provides a more rustic and informal look. Accepts paint and stain well. |
| Fir | Douglas Fir, Grand Fir | Moderate durability; less naturally resistant to rot and insects than cedar or redwood. Requires regular maintenance and protective treatments. | Light to medium brown tones; straight grain; versatile and can achieve a variety of aesthetic looks depending on finish. |
Wood Siding Styles
Beyond the type of wood, the style of the siding also contributes significantly to the overall aesthetic of your home. Different profiles create different visual effects.
For instance, clapboard siding features overlapping horizontal boards that create a classic, traditional look. Shiplap siding, with its tightly fitted boards, offers a clean, modern feel. Shingle siding, using individual wood shingles, provides a more rustic and textured appearance. Finally, board and batten siding uses vertical boards with narrow strips covering the seams, creating a clean, vertical emphasis.
Identifying Damage to Wood Siding
Inspecting your wood siding for damage is crucial for preventing further deterioration and maintaining your home’s curb appeal. Regular checks will help you catch small problems before they become costly repairs. Knowing what to look for will save you time and money in the long run.
Damage to wood siding can manifest in several ways, each with its telltale signs and potential causes. Understanding these signs is the first step towards effective repair.
Signs of Wood Siding Damage, Wood Siding Repair
Common indicators of damage include discoloration, warping, cracking, and the presence of insects or fungal growth. These can result from exposure to the elements, insect infestations, or improper installation. The severity of the damage will dictate the necessary repair approach, ranging from simple patching to complete board replacement.
Examples of Wood Siding Damage
Let’s examine some specific examples of wood siding damage and how to identify them.
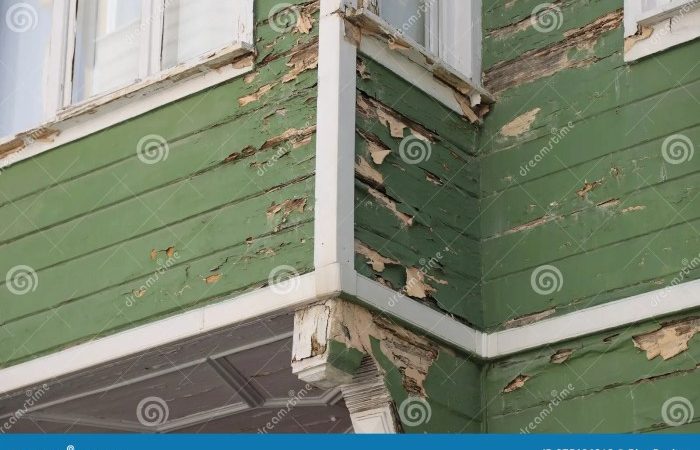
Example 1: Rotted Siding Imagine a section of cedar clapboard siding near the ground. The bottom six inches are significantly darker than the rest of the board, showing a soft, spongy texture when pressed. Small cracks are visible, and the wood crumbles easily. This is classic rot, likely caused by prolonged exposure to moisture from splashing rain or ground contact. The severity is high, requiring replacement of the affected section.
Example 2: Insect Infestation Picture a section of redwood shingles. Small, perfectly round holes are scattered across several shingles, and fine sawdust-like material is visible around the holes. This strongly suggests wood-boring insect infestation, possibly carpenter ants or termites. The severity depends on the extent of the infestation; if only a few shingles are affected, localized repair might suffice; however, widespread infestation may require more extensive work.
Example 3: Water Damage Consider a section of painted pine lap siding. The paint is peeling and blistering in a specific area, revealing discolored wood underneath. A darker stain is visible, spreading upward from the bottom edge of the board. This indicates water damage, likely from a leak in the roof or inadequate flashing around windows. The severity depends on the extent of the water penetration; surface damage may only need repainting, while deep water damage might require board replacement.
Assessing the Extent of Damage
Determining the necessary repair approach depends on a careful assessment of the damage. Start by identifying the type of damage (rot, insect infestation, water damage). Then, assess the extent of the affected area. Is it a small, localized problem, or does it affect a larger section of siding? Is the structural integrity of the wall compromised? If the damage is extensive or involves structural issues, it’s advisable to consult a professional contractor. For smaller, isolated problems, DIY repairs might be feasible. Always prioritize safety and use appropriate personal protective equipment (PPE) when working with damaged wood.
Repairing Damaged Wood Siding
Repairing damaged wood siding can significantly extend the life of your home’s exterior and maintain its curb appeal. Whether it’s a small crack or a completely rotten board, addressing the damage promptly prevents further deterioration and costly repairs down the line. This section outlines the steps involved in repairing minor damage and replacing severely damaged siding.
Repairing Minor Damage
Minor damage, such as small cracks or loose boards, can often be repaired with relative ease. For cracks, carefully clean the area and apply a high-quality exterior-grade wood filler, ensuring it’s pressed firmly into the crack and level with the surrounding wood. Once dry, sand the filler smooth and apply a matching exterior paint or stain. For loose boards, carefully check the nails or fasteners securing them. If they’re loose, gently tap them back in place using a hammer and nail set. If the fasteners are broken or pulled through, you may need to add new ones, drilling pilot holes first to prevent splitting the wood. Always use exterior-grade fasteners.
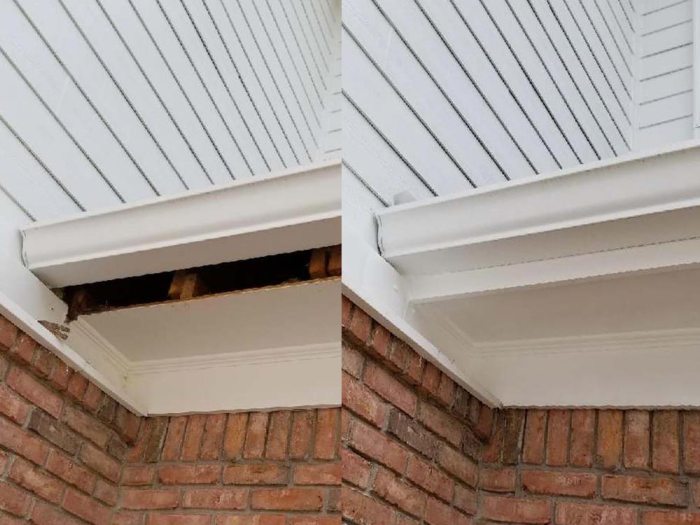
Replacing Damaged or Rotten Siding Boards
Replacing rotten or severely damaged siding boards requires a more involved process. This typically involves removing the damaged board and installing a new one that matches the existing siding.
- Preparation: Carefully examine the damaged area to determine the extent of the damage. You may need to remove several boards to ensure a proper repair. Protect the surrounding area with drop cloths or plastic sheeting.
- Removal: Using a pry bar and hammer, carefully remove the damaged siding board(s). Start by gently prying at one end, working your way along the board to avoid damaging surrounding boards. Remove any nails or fasteners.
- Inspection: Inspect the area behind the removed board for any further damage to the sheathing or underlying structure. Repair any rot or damage before installing the new board.
- Installation: Cut a new board to the correct length, ensuring it matches the existing siding. Using exterior-grade nails or screws, attach the new board, starting at the top and working your way down. Space the fasteners appropriately to prevent splitting the wood. Use a nail set to countersink the nails slightly below the surface.
- Finishing: Caulk any gaps between the new board and surrounding boards to prevent water intrusion. Apply a coat of exterior paint or stain to match the existing siding, ensuring a seamless finish.
Tools and Materials for Wood Siding Repair
Having the right tools and materials makes the repair process much smoother and more efficient. Gathering everything beforehand saves time and frustration.
- Pry bar: For removing damaged siding boards.
- Hammer: For driving nails and removing old fasteners.
- Nail set: For countersinking nails below the surface.
- Measuring tape and pencil: For accurate measurements and marking.
- Saw (hand saw or circular saw): For cutting new siding boards to size.
- Drill and drill bits: For pre-drilling pilot holes to prevent splitting the wood and installing screws.
- Exterior-grade wood filler: For filling small cracks and gaps.
- Putty knife or scraper: For applying wood filler and removing excess material.
- Sandpaper: For smoothing wood filler and removing rough edges.
- Exterior-grade paint or stain: To match the existing siding.
- Caulk: To seal gaps and prevent water intrusion.
- Safety glasses and work gloves: To protect yourself from injury.
- Exterior-grade nails or screws: For securing the new siding boards.
- Drop cloths or plastic sheeting: To protect the surrounding area from damage.
Preventing Future Damage: Wood Siding Repair
Source: colorfauxwalls.net
Protecting your wood siding investment involves more than just fixing existing problems; it’s about proactive measures to prevent future damage. Regular maintenance and the application of protective coatings are key to extending the life and beauty of your siding. Understanding the role of proper ventilation in preventing moisture buildup is also crucial.
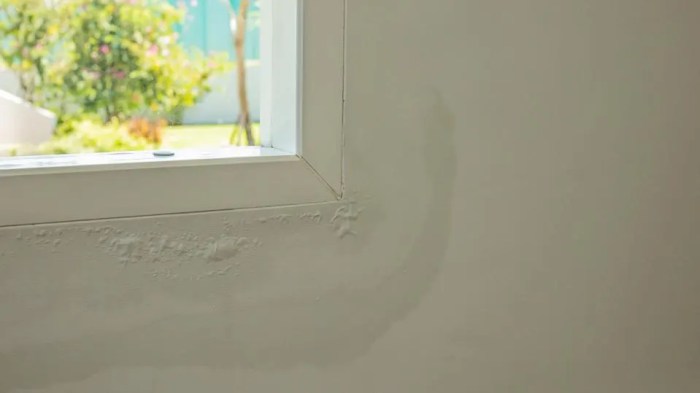
Proper ventilation is essential for preventing moisture buildup within the wall system. Moisture trapped behind the siding can lead to rot, mold growth, and insect infestation, significantly reducing the lifespan of your siding and potentially causing structural damage to your home. Adequate airflow allows moisture to escape, keeping the wood dry and healthy. This is achieved through proper soffit and fascia ventilation, as well as ensuring that there’s no blockage preventing air circulation behind the siding.
Preventing Moisture Buildup
Moisture is the enemy of wood siding. Preventing its penetration and ensuring its quick evaporation is paramount. This involves several key strategies: regular cleaning to remove dirt and debris that can trap moisture, proper sealing around windows and doors to prevent water intrusion, and ensuring gutters and downspouts are clean and functioning correctly to divert water away from the foundation and siding. A properly functioning drainage system around the house also minimizes contact between the siding and ground moisture.
Preventative Maintenance Schedule
A regular maintenance schedule is vital for preventing costly repairs down the line. This schedule should include both visual inspections and proactive treatments.
| Task | Frequency | Details |
|---|---|---|
| Visual Inspection | Twice yearly (Spring & Fall) | Check for loose or damaged siding, signs of rot, insect infestation, and paint deterioration. Pay close attention to areas prone to moisture accumulation, such as around windows, doors, and ground level. |
| Cleaning | Annually (Spring) | Gently clean the siding with a pressure washer (low pressure setting) or a soft brush and mild detergent. Rinse thoroughly to remove all soap residue. Avoid using harsh chemicals that can damage the wood or protective coatings. |
| Caulking and Sealing | As needed (during inspections) | Inspect and re-caulk around windows, doors, and other areas where gaps may exist. Use a high-quality, paintable caulk designed for exterior use. |
| Protective Coating Reapplication | Every 3-5 years (depending on the coating and environmental conditions) | Reapply a protective coating, such as paint or stain, to maintain the integrity of the wood and protect it from the elements. Follow the manufacturer’s instructions carefully for best results. |
Regular maintenance is significantly cheaper than major repairs. Early detection of problems prevents them from escalating into more costly issues.
Cost Considerations for Wood Siding Repair
Source: forbes.com
Repairing wood siding can be a significant investment, depending on the extent of the damage and the chosen repair method. Factors like material costs, labor charges, and any necessary permits all contribute to the overall expense. Understanding these costs upfront helps in budgeting and planning your project effectively.
Cost Breakdown of Wood Siding Repair
The cost of wood siding repair is variable and depends heavily on several factors. These factors include the type of wood, the size of the area needing repair, the complexity of the damage, your location (labor costs vary geographically), and the chosen repair method. Generally, you can expect to pay for materials, labor, and potentially permits.
Material Costs for Wood Siding Repair
Material costs encompass the price of replacement wood siding boards, fasteners (nails, screws), wood filler, primer, paint or stain, and any necessary sealants or caulk. The type of wood significantly impacts the cost; premium woods like cedar or redwood are more expensive than less expensive options like pine. For example, a single 6-foot long cedar board might cost $15-$30, while a comparable pine board might cost $8-$15. Additional materials like high-quality exterior-grade paint can add another $25-$50 per gallon.
Labor Costs for Wood Siding Repair
Labor costs depend on the contractor’s hourly rate and the time required for the repair. Simple repairs like patching small holes might take a few hours, while extensive repairs involving board replacement could take a full day or more. Hourly rates for skilled carpenters can range from $50 to $100 or more, depending on location and experience. Therefore, even a seemingly small repair can quickly accumulate labor costs.
Cost Comparison of Repair Methods
Patching damaged areas is generally less expensive than replacing entire boards. Patching involves filling minor holes or cracks with wood filler, sanding smooth, and then painting or staining to match the surrounding siding. Full board replacement, on the other hand, requires removing the damaged board, installing a new one, and matching the color and finish.
| Repair Type | Material Cost | Labor Cost |
|---|---|---|
| Patching small holes (1-2 sq ft) | $10 – $30 | $50 – $150 |
| Replacing a single board (approx. 6 sq ft) | $20 – $75 | $100 – $300 |
| Repairing significant damage (10 sq ft+) | $100 – $500+ | $500 – $1500+ |
Note: These cost estimates are approximate and can vary widely depending on the factors mentioned earlier. It’s always best to get multiple quotes from reputable contractors before starting any repair project.
Advanced Repair Techniques

Source: dreamstime.com
For severely damaged wood siding, basic repairs may not suffice. Advanced techniques are necessary to restore structural integrity and aesthetic appeal. These techniques often involve specialized materials and a deeper understanding of woodworking and repair principles. Proper execution is key to ensuring a long-lasting and visually pleasing result.
Epoxy Fillers and Specialized Patching Compounds
Epoxy fillers offer exceptional strength and durability for filling large gaps, cracks, and holes in wood siding. These two-part compounds are mixed just before application, creating a strong, adhesive material that bonds effectively with wood. Specialized patching compounds, often formulated for exterior use, provide similar benefits with varying levels of flexibility and paintability. When using epoxy fillers, ensure the surface is clean and dry for optimal adhesion. Apply the filler in layers, allowing each layer to cure before adding the next, to prevent shrinkage and cracking. Once cured, the filler can be sanded smooth and painted to match the surrounding siding. For larger repairs, consider using wood shims or reinforcing pieces behind the filler to provide additional structural support.
Restoring Historically Significant Wood Siding
Restoring historically significant wood siding requires meticulous attention to detail and a preservation-minded approach. The goal is not just repair, but to maintain the historical integrity of the structure. This often involves using traditional methods and materials, such as hand-planing instead of power sanding, and employing historically accurate paints and stains. Careful assessment of the damage is crucial, prioritizing methods that minimize alteration to the original material. If replacement is necessary, sourcing wood of a similar age, species, and weathering profile is essential to maintain visual consistency. Consult with historical preservation experts or experienced restoration contractors to ensure the process adheres to best practices and avoids irreversible damage. Documentation of the repair process is also vital for future reference and preservation efforts.
Matching New Siding to Existing Siding
Matching new siding to existing siding is critical for maintaining a cohesive and visually appealing exterior. This involves selecting siding of the same species, grade, and finish as the original material. If the original siding is weathered or faded, consider using a weathering technique on the new siding to achieve a consistent appearance. This might involve using a specific stain or paint to match the existing color and texture. For significant color discrepancies, a professional color matching service may be necessary. Proper installation is also essential. Ensure the new siding is installed seamlessly with the existing siding, minimizing any noticeable transitions or differences in texture. Careful attention to detail in both material selection and installation is paramount to achieving a successful match.
Outcome Summary
Repairing wood siding doesn’t have to be a stressful ordeal. By understanding the different types of siding, identifying damage correctly, and following the proper repair techniques, you can significantly extend the life of your home’s exterior. Remember that preventative maintenance is key – regular inspections and protective treatments will go a long way in preventing costly repairs down the road. So, grab your tools, follow our guide, and get ready to restore your home’s beauty and protect your investment!
FAQ Section
Can I repair wood siding myself, or should I hire a professional?
Minor repairs like patching small cracks or replacing a single board are often DIY-friendly. However, for extensive damage or if you’re uncomfortable working at heights, it’s best to hire a professional.
How long does wood siding repair typically take?
The time required varies greatly depending on the extent of the damage and the size of the repair area. Small repairs might take a few hours, while larger projects could take several days or even weeks.
What’s the best way to clean wood siding before repair?
Use a soft bristle brush and a gentle cleaning solution (like a mixture of water and mild detergent) to remove dirt and debris. Avoid high-pressure washers, as they can damage the wood.
How can I match new siding to existing siding?
Purchase extra siding boards from the original source if possible. If that’s not an option, try to find a similar type and color of wood at a lumber yard. Consider using wood stain to blend new and old siding.
What kind of warranty can I expect on repaired siding?
Warranties vary depending on the materials used and the contractor. Always inquire about warranties before starting any repair work.
Comments are closed.