Wood Siding Contractors Your Guide
Wood siding contractors are essential for achieving the beautiful, durable exterior you envision for your home. Choosing the right contractor involves understanding the various types of wood siding, the installation process, and the associated costs. This guide helps you navigate these aspects, from finding qualified professionals to maintaining your new siding for years to come. We’ll cover everything from sourcing the right contractor to budgeting for your project and ensuring a smooth, successful installation.
Finding the right contractor is crucial. We’ll explore different ways to find reputable professionals, including online directories, referrals, and local networking. We’ll then delve into the specifics of wood siding materials, installation techniques, and cost considerations. Finally, we’ll discuss maintaining your investment to ensure its longevity and beauty.
Finding Wood Siding Contractors
Finding the right contractor for your wood siding project is crucial for a successful and long-lasting outcome. A poorly chosen contractor can lead to costly mistakes, shoddy workmanship, and significant headaches. This section will guide you through the process of finding and vetting qualified professionals.
Locating Wood Siding Contractors
Homeowners have several avenues to explore when searching for wood siding contractors. These options range from utilizing online resources to relying on personal referrals. Each method offers unique advantages and disadvantages, which should be carefully considered before making a decision. Understanding these differences will help you make an informed choice and find the best fit for your needs.
Online and Offline Resources for Finding Contractors
A variety of online and offline resources can help you locate qualified contractors. Online, you can utilize websites like Angie’s List, HomeAdvisor, Yelp, and Nextdoor, which often feature reviews and ratings from past clients. You can also search directly through Google or other search engines, specifying your location and the type of service required. Offline, you can ask friends, family, and neighbors for recommendations, check local business directories, or attend home improvement shows and expos. Don’t underestimate the power of word-of-mouth; personal recommendations can be invaluable.
Vetting Contractors and Checking Qualifications
Before committing to any contractor, thorough vetting is essential. This involves checking their licenses and insurance, verifying their experience through references, and reviewing their past projects. Request proof of licensing and insurance from each contractor, and don’t hesitate to contact their references to inquire about their work ethic, professionalism, and the quality of their completed projects. Pay attention to online reviews, but also be aware that some reviews might be fake or biased. Look for patterns and consistency in the feedback. Finally, get everything in writing – a detailed contract outlining the scope of work, payment schedule, and timeline.
Comparison of Contractor Finding Methods
| Method | Pros | Cons | Ease of Use |
|---|---|---|---|
| Online Directories (e.g., HomeAdvisor) | Wide selection, reviews available, easy comparison | Potential for unqualified contractors, some reviews may be fake | High |
| Referrals (friends, family) | Trustworthy source, personal experience insights | Limited options, may not be geographically convenient | Low |
| Local Business Directories | Access to local contractors, potentially quicker response | Fewer reviews, harder to compare contractors | Medium |
| Home Improvement Shows/Expos | Opportunity to meet contractors face-to-face, see samples | Time-consuming, may require travel | Medium |
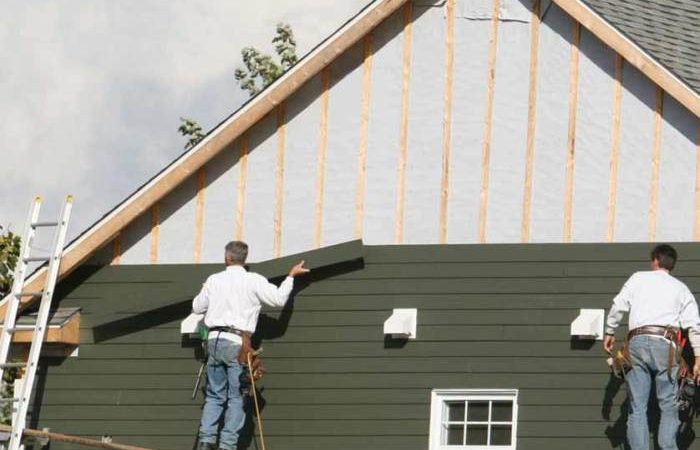
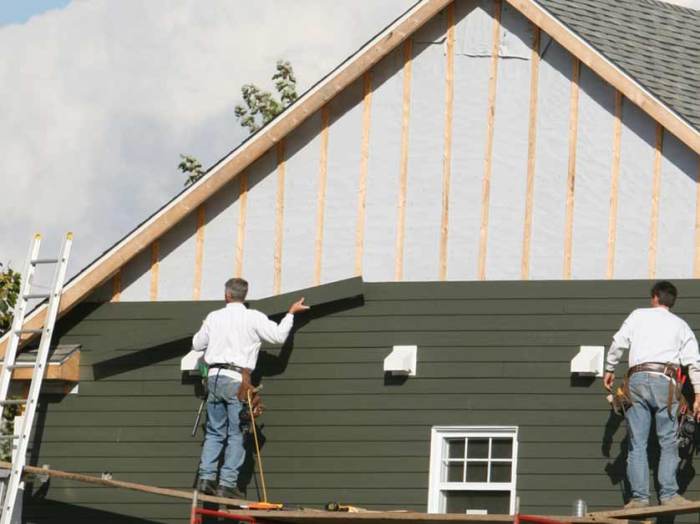
Types of Wood Siding and Contractor Expertise: Wood Siding Contractors

Source: craftsmanexterior.com
Choosing the right wood siding for your home is a big decision, impacting both its aesthetics and longevity. Equally important is selecting a contractor with the necessary skills to install it correctly. Different wood types require different expertise, and a mismatch can lead to costly repairs down the line. This section will explore the various types of wood siding and the specific skills needed for their proper installation.
Choosing the right wood siding for your home is a big decision, impacting both its aesthetics and longevity. Equally important is selecting a contractor with the necessary skills to install it correctly. Different wood types require different expertise, and a mismatch can lead to costly repairs down the line. This section will explore the various types of wood siding and the specific skills needed for their proper installation.
Common Wood Siding Materials
Several wood types are commonly used for siding, each possessing unique properties influencing its suitability and installation. Cedar, redwood, and pine are popular choices, each offering a distinct look and performance profile. Cedar, known for its durability and natural resistance to decay, often commands a higher price. Redwood, similarly resistant and visually appealing, also offers excellent longevity. Pine, a more affordable option, requires more maintenance to prevent rot and insect damage. The choice depends on budget, desired aesthetic, and the local climate.
Specific Skills for Wood Siding Installation
The installation process varies significantly depending on the wood type and the siding profile (e.g., clapboard, shiplap, shingles). Cedar and redwood, due to their inherent durability, may allow for slightly less precise cuts, though accuracy remains crucial. Pine, being softer, requires more careful handling to avoid damage during installation. Contractors should possess proficiency in using various power tools, including circular saws, miter saws, and nail guns, all while maintaining precision and minimizing waste. Understanding wood grain direction and ensuring proper fastener placement are essential for preventing warping and splitting. Furthermore, experience with moisture barriers and proper flashing techniques is critical for preventing water damage, a major concern with any wood siding.
Installation Techniques for Different Wood Siding Types
Installation techniques differ subtly but significantly between wood types. For instance, cedar and redwood often benefit from the use of stainless steel fasteners to resist corrosion and staining. Pine, being more susceptible to damage, might require the use of pre-drilled pilot holes to prevent splitting. The spacing of fasteners also varies depending on the wood type and the thickness of the siding. Furthermore, the application of sealants and water-resistant coatings can differ, requiring specific knowledge of product compatibility with each wood type. Proper installation also accounts for expansion and contraction of the wood due to seasonal temperature and humidity changes, requiring careful planning and execution.
Contractor Certifications and Specializations
Selecting a contractor with the right credentials is vital for a successful project. While there isn’t a single, universally recognized “wood siding installer” certification, several indicators suggest a contractor’s expertise.
- Years of experience: A proven track record of successful wood siding installations speaks volumes.
- References and testimonials: Check past client reviews to gauge their workmanship and customer service.
- Insurance and licensing: Ensure the contractor is properly insured and licensed to operate in your area.
- Specific training or certifications in exterior building finishes: Look for evidence of training in areas like water management and building envelope systems.
- Membership in professional organizations: Affiliations with reputable organizations like the National Association of Home Builders (NAHB) can indicate a commitment to professionalism and best practices.
The Wood Siding Installation Process
Installing wood siding is a multi-step process requiring careful planning and execution to ensure a long-lasting, aesthetically pleasing result. Proper preparation and attention to detail are crucial for preventing future problems like water damage or warping. This section details the typical steps, materials, and best practices involved.
The installation process can vary slightly depending on the type of wood siding used (lap siding, shiplap, etc.) and the complexity of the house’s exterior. However, the core principles remain consistent. A skilled contractor will adapt their approach to the specific project requirements.
Materials and Tools Required
A successful wood siding installation depends on having the right tools and materials on hand. This minimizes delays and ensures a smooth workflow. Lack of proper equipment can lead to poor workmanship and potential damage.
Materials: Wood siding (pre-primed or unprimed, depending on preference), house wrap, flashing tape, nails or screws (appropriate size and type for the siding), caulk, primer (if using unprimed siding), exterior paint or stain (optional), and any necessary trim pieces (e.g., corner boards, J-channels, starter strips).
Tools: Measuring tape, level, chalk line, circular saw or miter saw, hammer or impact driver, nail gun (optional but highly recommended for efficiency), safety glasses, work gloves, utility knife, ladder (appropriate height and sturdy), and possibly a scaffolding system for taller structures.
Exterior Wall Preparation
Before any siding goes up, thorough preparation of the exterior walls is essential. This prevents problems down the road and ensures a secure and long-lasting installation. Neglecting this step is a common cause of future issues.
This involves inspecting the walls for any damage, repairing any cracks or holes, and ensuring the walls are clean and dry. All loose or damaged wood should be removed and replaced. Furthermore, any existing siding should be carefully removed, disposing of it properly. Finally, applying a house wrap is crucial for providing a moisture barrier.
Step-by-Step Installation Guide
Step 1: Establish a Straight Line: Use a chalk line to mark a perfectly straight reference line along the bottom of the wall where the first course of siding will be installed. This is crucial for maintaining a neat and even appearance.
Step 2: Install the Starter Strip: A starter strip provides a level base for the first course of siding. Ensure it’s securely fastened and perfectly aligned with the chalk line. This step is vital for consistent spacing.
Step 3: Install the First Course of Siding: Beginning at one corner, install the first course of siding, ensuring proper spacing and alignment with the starter strip. Use nails or screws to secure the siding, following the manufacturer’s recommendations.
Step 4: Continue Installing Subsequent Courses: Continue installing subsequent courses of siding, overlapping each course according to the manufacturer’s instructions. Maintain consistent spacing and alignment throughout the process. Use a level frequently to check for plumbness and straightness.
Step 5: Install Corner Boards and Trim: Install corner boards and other trim pieces, ensuring they are properly mitered and aligned. Use caulk to seal any gaps or joints. Careful attention to detail here greatly improves the finished look.
Step 6: Finishing Touches: Once the siding is installed, inspect the entire installation for any gaps or inconsistencies. Caulk any gaps, and consider priming and painting or staining the siding to protect it from the elements and enhance its appearance.
Cost Considerations and Budgeting

Source: tcsidingprofessionals.com
Planning your wood siding project requires careful consideration of the costs involved. Many factors influence the final price, from the type of wood chosen to the complexity of the installation. Understanding these factors will help you create a realistic budget and avoid unexpected expenses.
Factors Influencing Wood Siding Costs
Several key factors significantly impact the overall cost of a wood siding project. These include the type of wood, the amount of siding needed, the complexity of the installation (including any necessary repairs or prep work), labor costs, and the cost of permits and inspections. The geographic location also plays a role, as labor and material costs can vary regionally. For example, cedar siding, known for its durability and beauty, typically costs more than pine siding. A complex installation on a large, multi-story home will naturally cost more than a straightforward job on a smaller structure.
Realistic Cost Ranges for Wood Siding
The cost of wood siding can vary widely depending on the factors mentioned above. As a general guideline, you can expect to pay anywhere from $7 to $25 per square foot for materials and installation. This range encompasses various wood types, installation complexities, and regional price differences. For example, a basic pine siding installation on a small structure might fall closer to the lower end of this range, while a high-end cedar siding project on a large home with intricate detailing could easily reach the higher end or even exceed it. Remember that these are estimates, and a detailed quote from a contractor is crucial for accurate budgeting.
Cost Comparison of Wood Siding Materials and Installation Methods
Different wood siding materials and installation methods have varying cost implications. For instance, cedar siding, while more expensive initially, offers superior longevity and requires less maintenance in the long run, potentially offsetting the higher upfront cost. Pre-finished siding might cost more than unfinished siding but eliminates the need for on-site painting, saving time and labor. The installation method itself also influences cost. For example, installing horizontal siding is generally less expensive and time-consuming than installing vertical or shiplap siding. Using experienced installers, while costing more upfront, may result in higher-quality work, reducing the likelihood of costly repairs down the line.
Sample Budget Breakdown for Wood Siding Project
The following table illustrates a sample budget breakdown for a wood siding project. Remember that this is an estimate, and your actual costs may vary. It’s crucial to obtain multiple quotes from reputable contractors to ensure accuracy.
| Item | Cost | Percentage of Total |
|---|---|---|
| Materials (Wood Siding, Fasteners, etc.) | $8000 | 40% |
| Labor (Installation, Prep Work) | $7000 | 35% |
| Permits and Inspections | $500 | 2.5% |
| Contingency (Unexpected Costs) | $2500 | 12.5% |
| Total Estimated Cost | $20000 | 100% |
Maintenance and Longevity of Wood Siding
Wood siding, while beautiful and durable, requires regular maintenance to protect its investment and extend its lifespan. Neglecting this crucial aspect can lead to costly repairs and premature replacement. Proper care ensures your siding remains aesthetically pleasing and structurally sound for years to come.
Proper maintenance significantly impacts the longevity and appearance of your wood siding. Regular cleaning prevents the buildup of dirt, mildew, and algae, which can damage the wood and diminish its curb appeal. Periodic staining and sealing protect the wood from the elements, preventing moisture damage, rot, and insect infestation. This proactive approach not only saves money on repairs but also maintains the value of your home.
Cleaning Wood Siding
Cleaning your wood siding is the foundation of a good maintenance plan. A simple pressure washing (using a low-pressure setting to avoid damaging the wood) once or twice a year can remove loose dirt, debris, and surface mold. For more stubborn stains, a solution of mild detergent and water can be applied, followed by rinsing with clean water. Always allow the siding to dry completely before applying any stain or sealant. Consider using a specialized wood cleaner for particularly dirty or mildew-ridden areas. Remember to protect surrounding landscaping during the cleaning process.
Staining and Sealing Wood Siding
Staining and sealing are crucial steps in protecting your wood siding from the elements. Stain penetrates the wood, enhancing its color and providing UV protection. Sealant creates a barrier against moisture, preventing rot and insect damage. The frequency of staining and sealing depends on the type of stain and sealant used, as well as the climate. In harsher climates with more sun and rain, more frequent applications may be necessary. For example, a high-quality, oil-based stain might last five years, while a water-based stain may need reapplication every two to three years. Always follow the manufacturer’s instructions for application.
Consequences of Neglecting Wood Siding Maintenance
Ignoring regular maintenance can lead to a range of problems, from unsightly discoloration and mildew growth to serious structural damage. Unprotected wood is susceptible to moisture penetration, leading to rot and decay. This can weaken the siding, creating gaps and vulnerabilities that allow insects and pests to infest the structure. Furthermore, neglected siding can become a breeding ground for mold and mildew, potentially affecting indoor air quality and posing health risks. Repairing such extensive damage is significantly more expensive than regular maintenance. For instance, replacing a section of severely rotted siding can cost several times more than a simple re-staining.
Long-Term Benefits of Proper Maintenance
Proper maintenance translates to a significant increase in the lifespan of your wood siding. Regular cleaning, staining, and sealing prevent premature deterioration, keeping your siding looking its best for many years. A well-maintained home with attractive siding also increases its curb appeal and market value. Think of it as an investment – the relatively small cost of regular maintenance far outweighs the expense of extensive repairs or premature replacement. A home with properly maintained wood siding might easily last 30-50 years or more, compared to a poorly maintained home which may require siding replacement within 10-15 years.
Dealing with Contractors and Contracts
Choosing the right wood siding contractor and navigating the contractual process is crucial for a successful project. Clear communication, a well-defined contract, and careful comparison of bids are key to avoiding costly mistakes and ensuring a high-quality outcome. This section, Articles strategies for managing these aspects effectively.
Effective communication with your contractor is paramount. This means clearly articulating your vision, asking specific questions, and actively listening to their responses. Maintaining open lines of communication throughout the project ensures that any issues are addressed promptly and prevents misunderstandings from escalating.
Essential Contract Clauses
A comprehensive contract protects both you and the contractor. Essential clauses should clearly define the scope of work, including materials, labor, and timelines. Payment schedules, outlining milestones and corresponding payments, are also crucial. Crucially, the contract should detail the warranty provided, specifying the duration and coverage of defects or workmanship issues. Dispute resolution mechanisms should also be included, outlining how disagreements will be addressed. For example, a contract might specify that a third-party arbitrator will be involved in case of a dispute. Consider including a clause about permitting and inspections, detailing who is responsible for obtaining necessary permits and scheduling inspections. Finally, a clear description of the payment terms, including any penalties for late payments or incomplete work, should be included.
The Importance of Multiple Bids
Obtaining multiple bids from different contractors is vital for fair price comparison and ensuring you’re getting the best value for your money. This competitive process helps identify contractors who may overcharge or offer substandard services. Each contractor should be provided with the same detailed specifications for the project to ensure accurate and comparable bids.
Comparing Contractor Bids Effectively
Comparing bids solely on price can be misleading. Consider factors like the contractor’s experience, licensing, insurance coverage, and reputation. Check online reviews and request references from previous clients. Examine the detailed breakdown of costs in each bid, looking for hidden charges or discrepancies. For instance, one bid might appear cheaper initially but lack crucial elements like waste removal or necessary permits, ultimately leading to increased costs later. Compare the proposed materials and their quality. A lower price might reflect the use of inferior materials that could impact the longevity and appearance of your siding. Analyze the proposed timeline and ensure it aligns with your expectations. Finally, consider the contractor’s communication style and responsiveness; a contractor who is responsive and readily addresses your questions is a positive sign. For example, if one contractor is quick to respond to emails and readily explains complex aspects of the project, this demonstrates good communication and client focus.
Concluding Remarks
Source: amazonaws.com
Transforming your home’s exterior with wood siding is a significant investment, but with careful planning and the right contractor, the results are stunning. Remember to thoroughly vet potential contractors, obtain multiple bids, and understand the installation process and maintenance requirements. By following the advice in this guide, you can confidently embark on your wood siding project, knowing you’ve made informed decisions that will enhance your home’s curb appeal and value for years to come. Don’t hesitate to ask questions and ensure you’re comfortable with every aspect of the project before signing any contracts.
Clarifying Questions
What is the average lifespan of wood siding?
With proper maintenance, wood siding can last 30-50 years or even longer.
Do I need a permit for wood siding installation?
Most areas require permits; check with your local building department.
How do I handle unexpected issues during installation?
Your contract should include procedures for handling unforeseen problems; discuss contingency plans with your contractor upfront.
What’s the best way to clean wood siding?
Regularly wash with a mild detergent solution and a soft brush; avoid high-pressure washers.
Can I install wood siding myself?
While possible, it’s generally recommended to hire professionals for a quality, long-lasting result.
Comments are closed.