Hardie Board Installers Near Me
Hardie board installers near me: Finding the right pro for your home improvement project can feel overwhelming. This guide breaks down everything you need to know, from finding reputable installers online to understanding costs, warranties, and the installation process itself. We’ll help you navigate the world of Hardie board, ensuring a smooth and successful project.
Choosing the right installer is key to a beautiful and long-lasting result. This guide covers crucial aspects like checking certifications, comparing quotes, and understanding the different types of Hardie board available. We’ll also delve into what to expect during the installation process and how to maintain your new siding for years to come.
Local Installer Search Results
Source: kirknessroofing.com
Finding a reliable Hardie board installer can feel overwhelming with so many options available. Understanding how local search results work and what factors influence ranking is key to finding the best contractor for your project. This section will break down the key elements to consider when searching for local Hardie board installers online.
Several factors contribute to how high a Hardie board installer appears in your local search results. Google and other search engines use complex algorithms, but some key elements are consistently important.
Factors Influencing Local Search Ranking
The ranking of Hardie board installers in local search results depends on a combination of on-site and off-site factors. On-site factors relate to the installer’s website and online presence, while off-site factors concern their reputation and online mentions.
- Website Optimization: A well-designed website with relevant s (like “Hardie board siding installation,” “James Hardie installer,” and your city/region) improves search engine visibility.
- Online Reviews and Ratings: Positive reviews on Google My Business, Yelp, and other platforms significantly boost ranking. Consistent positive feedback shows search engines that the business is reputable and trustworthy.
- Local Citations: Consistent and accurate business information across various online directories (like Yelp, Angie’s List, etc.) strengthens local search ranking. Inconsistent or outdated information can negatively impact visibility.
- Backlinks: Links from other reputable websites pointing to the installer’s website signal authority and trustworthiness to search engines. These links can come from local business directories, blogs, or even customer testimonials.
- Google My Business Profile: A complete and optimized Google My Business profile is crucial. This includes accurate business information, photos, operating hours, and customer reviews. This is often a top factor in local search ranking.
Comparison of Online Directories
Several online directories can help you find local Hardie board installers. Each has its strengths and weaknesses. The table below compares some popular options.
| Directory | Ease of Use | Review Availability | Geographic Coverage |
|---|---|---|---|
| Google My Business | Excellent | Excellent | Excellent |
| Yelp | Good | Excellent | Good |
| Angie’s List | Good | Good | Good |
| Nextdoor | Good | Good | Limited to Neighborhoods |
Importance of Online Reviews and Ratings
Online reviews and ratings are crucial when choosing a Hardie board installer. They offer valuable insights into the contractor’s professionalism, quality of work, customer service, and overall reliability. Ignoring reviews can lead to hiring an unreliable contractor, resulting in costly mistakes or delays.
Look for patterns in reviews. Consistent positive feedback suggests a reliable contractor, while numerous negative reviews should raise concerns. Pay attention to both the number of reviews and the overall star rating. A high number of reviews with a consistently high rating indicates a strong reputation. Consider also the specific details mentioned in reviews—did the contractor communicate well? Were they on time and within budget? Did they clean up after the job?
Installer Qualifications and Experience
Source: lifetime-exteriors.net
Choosing the right Hardie board installer is crucial for a long-lasting, beautiful, and weather-resistant exterior. Don’t just focus on price; prioritize experience and qualifications to ensure a professional and quality installation. This section will help you understand what to look for when selecting an installer.
Finding a qualified Hardie board installer involves verifying their credentials and assessing their experience. This ensures the job is done correctly, protecting your investment and preventing costly future repairs. The following sections detail the key aspects to consider.
Relevant Certifications and Licenses
Several certifications and licenses demonstrate a Hardie board installer’s commitment to quality and adherence to industry best practices. These credentials often involve training and testing to prove competency in handling Hardie products and following proper installation techniques. Examples include certifications from the James Hardie company itself (though specific programs may vary by region), general contractor licenses, and specialized certifications for exterior siding installation. State-specific licensing requirements for contractors should also be verified. Checking for these certifications helps ensure the installer has the necessary knowledge and skills.
Experience Levels to Consider
When selecting a Hardie board installer, consider both the number of years of experience and the types of projects they’ve completed. Aim for installers with at least 5-7 years of experience in exterior siding installation, with a significant portion dedicated to Hardie board. Reviewing their portfolio is essential. Look for projects similar in scale and complexity to your own. Experience with diverse projects, including various Hardie board styles and applications (such as lap siding, shingles, panels), indicates versatility and adaptability. A proven track record with similar-sized projects minimizes the risk of unforeseen complications during your installation.
Checklist of Questions to Ask Potential Installers
Before hiring, prepare a list of questions to assess the installer’s qualifications and suitability. Asking these questions allows you to compare potential installers and make an informed decision.
- How many years of experience do you have installing Hardie board siding?
- Can you provide references from previous clients?
- What types of Hardie board projects have you completed (e.g., size, style)?
- Do you hold any relevant certifications or licenses for Hardie board installation or general contracting?
- What is your process for ensuring proper ventilation and moisture management during installation?
- What is your warranty policy and what does it cover?
- Can you provide a detailed breakdown of the costs involved, including materials and labor?
- What is your estimated timeline for completing the project?
- Do you have insurance to cover potential damages or injuries during the installation?
- What is your process for handling potential issues or problems that may arise during the installation?
Project Scope and Cost Estimation
Getting a clear understanding of the cost involved in your Hardie board installation is crucial. Several factors contribute to the final price, and it’s important to discuss these upfront with your chosen installer to avoid unexpected expenses. This section breaks down those factors and shows you how to get accurate estimates.
Factors Influencing Hardie Board Installation Costs
The cost of installing Hardie board siding or trim depends on a combination of material costs, labor costs, project size, and complexity. Let’s explore each factor in detail.
Material Costs
Material costs are primarily determined by the type and quantity of Hardie board products needed. Different Hardie board products, such as siding panels, trim boards, and accessories (like flashing and fasteners), have varying price points. The total square footage of the area to be covered directly impacts the amount of material required, and therefore the overall cost. Higher-end products with more sophisticated textures or colors will also increase the material costs. For example, a larger home requiring more panels will naturally cost more than a smaller shed project.
Labor Costs
Labor costs are a significant portion of the overall expense. The installer’s hourly rate, the number of workers needed, and the time required to complete the job all contribute to this cost. Complex projects involving intricate trim work, difficult-to-access areas (such as steep roofs), or extensive repairs to existing siding will require more labor hours, thus increasing the overall cost. A simple installation on a single-story home will generally cost less than a multi-story home with complex architectural details.
Project Size and Complexity
The size of the project is directly proportional to the cost. Larger projects naturally require more materials and labor, resulting in a higher overall cost. Project complexity is another critical factor. Features like intricate trim details, multiple angles, or the need for extensive repairs to existing siding will increase both material and labor costs. A straightforward installation on a rectangular house will be cheaper than one with numerous dormers, bay windows, and complex angles.
Sample Contract Artikel
A well-defined contract protects both the homeowner and the installer. The following table, Articles, key aspects that should be included:
| Item | Description | Details | Notes |
|---|---|---|---|
| Project Description | Detailed description of the work to be performed. | Include specifics like square footage, type of Hardie board, and any additional work (e.g., removal of old siding). | Be as specific as possible. |
| Materials | List of all materials to be used, including brand, type, and quantity. | Specify whether materials are included in the price or are the homeowner’s responsibility. | Include manufacturer warranties if applicable. |
| Labor Costs | Breakdown of labor costs, including hourly rate and estimated hours. | Specify whether any additional charges might apply for unforeseen circumstances. | Consider potential overtime costs. |
| Total Cost | Total cost of the project, including materials and labor. | Clearly state the payment schedule. | Include any applicable taxes or permits. |
| Timeline | Estimated start and completion dates. | Include any potential delays and their impact on the timeline. | Be realistic about the timeframe. |
| Payment Terms | Detailed payment schedule, including deposit, progress payments, and final payment. | Specify payment methods accepted. | Include penalties for late payments. |
| Warranties | Warranties on materials and workmanship. | Specify the duration and terms of the warranties. | Ensure clarity on who is responsible for repairs under warranty. |
| Dispute Resolution | Process for resolving any disputes that may arise. | Specify the method of dispute resolution (e.g., mediation, arbitration). | Ensure a fair and transparent process. |
Methods for Obtaining Accurate Cost Estimates
Several methods can help obtain accurate cost estimates. Getting multiple bids from different installers is highly recommended. This allows for comparison of pricing and services offered. Clearly outlining the project scope and providing detailed measurements and specifications to each installer ensures you receive accurate and comparable quotes. Requesting detailed breakdowns of material and labor costs also helps in understanding the overall cost structure. Finally, checking references and verifying the installer’s license and insurance provides an added layer of protection.
Materials and Warranty
Choosing the right Hardie board product and understanding the warranty are crucial for a long-lasting, beautiful exterior. Different Hardie products offer varying levels of durability and resistance to the elements, making certain types more suitable for specific projects than others. Knowing what your warranty covers protects your investment and ensures you’re getting the best possible value for your money.
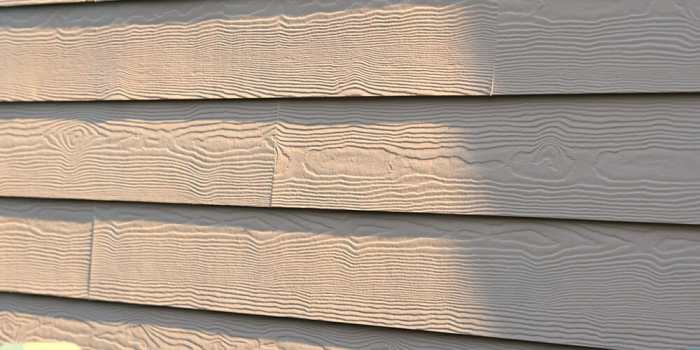
Hardie board siding comes in a variety of types, each designed for different applications and levels of exposure. Understanding these differences will help you and your installer choose the optimal product for your project.
Hardie Board Product Differences and Suitability
Hardie offers several product lines, each with its strengths. For example, HardiePlank® lap siding is a popular choice for its classic look and durability, while HardieShingle® siding provides a more textured, traditional aesthetic. HardiePanel® vertical siding offers a modern, clean look. The choice depends on your home’s architectural style and your personal preferences. Additionally, factors like climate and exposure to harsh weather will influence the optimal product selection. Homes in areas with high winds or heavy rain might benefit from a more robust product like HardieZōna™ with its superior wind resistance.
Manufacturer Warranties and Homeowner Protection
Manufacturer warranties are essentially insurance policies for your siding. They protect you against defects in materials and workmanship for a specified period. A comprehensive warranty can save you significant costs in repairs or replacements should something go wrong with your siding. For instance, if your siding starts to crack or fade prematurely due to a manufacturing defect, the warranty will cover the costs of repair or replacement, potentially saving you thousands of dollars. Always review the warranty carefully before making your purchase to understand its limitations and what is covered.
Comparison of Hardie Board Manufacturer Warranties
It’s important to note that specific warranty details can change, so always refer to the manufacturer’s current warranty documentation for the most up-to-date information. However, generally, warranties cover defects in materials and workmanship for a specific period.
- James Hardie: Typically offers a 30-year limited warranty on its products, covering defects in materials and workmanship. Specific details may vary by product line and region.
- Other Manufacturers (if applicable): If other manufacturers offer competing fiber cement siding products, their warranty terms should be compared directly to those offered by James Hardie. Key aspects to consider include the length of coverage, what is specifically covered, and any limitations or exclusions.
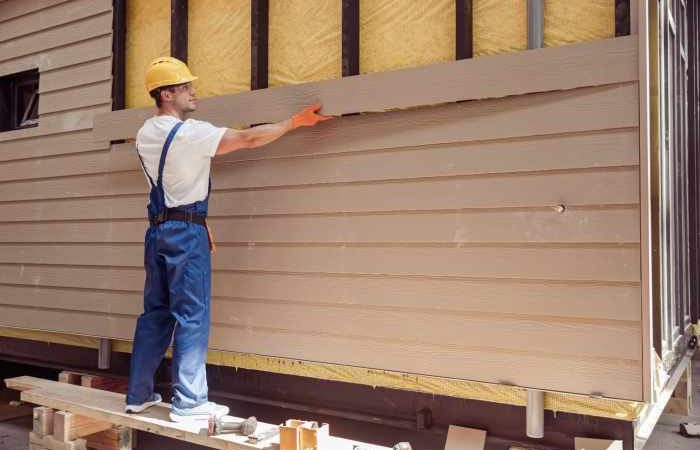
Installation Process and Best Practices
Installing Hardie board siding is a multi-step process requiring precision and attention to detail. Proper installation ensures a durable, long-lasting, and aesthetically pleasing exterior for your home. This section outlines the typical steps and best practices to achieve optimal results.
The installation process generally begins with thorough preparation of the existing wall surface, followed by the installation of the siding itself, and concludes with finishing touches. Each step is crucial for a successful outcome.
Preparation and Measurement
Before any siding goes up, careful preparation is essential. This involves removing old siding, repairing any damaged sheathing, and ensuring the underlying structure is sound and level. Accurate measurements are vital for minimizing waste and ensuring a clean, professional finish. Improper preparation can lead to significant problems down the line, such as warping or gaps in the siding.
Installation of Hardie Board
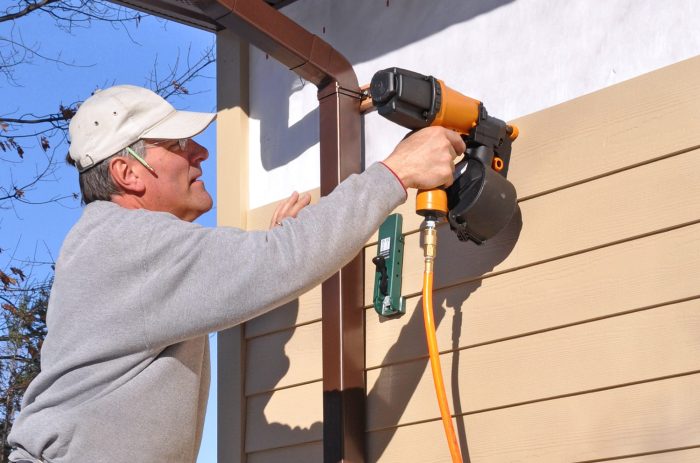
The actual installation of Hardie board involves nailing or screwing the panels to the prepared wall surface, following the manufacturer’s recommended spacing and overlapping techniques. Consistent spacing prevents warping and ensures a uniform look. Using the correct fasteners and driving them straight and flush prevents damage to the siding and helps avoid future problems. Special attention should be given to corners, windows, and doors, where precise cuts and careful installation are crucial.
Best Practices for Hardie Board Installation
Following best practices during installation significantly increases the longevity and performance of your Hardie board siding. These practices minimize potential issues and ensure a high-quality finish.
- Always use galvanized nails or corrosion-resistant screws specifically designed for Hardie board. Using inappropriate fasteners can lead to premature rusting and damage to the siding.
- Maintain consistent nail/screw spacing as recommended by the manufacturer. This prevents warping and ensures even expansion and contraction of the panels due to temperature changes.
- Ensure proper ventilation behind the siding to prevent moisture buildup. This is especially important in climates with high humidity.
- Use appropriate caulking and sealant to fill gaps and prevent water penetration around windows, doors, and other penetrations.
- Always pre-drill holes for screws, especially in thicker Hardie board panels, to prevent splitting.
- Allow for proper expansion and contraction of the siding by leaving the recommended gaps between panels and around trim.
Potential Installation Issues and Avoidance Strategies, Hardie board installers near me
Several issues can arise during Hardie board installation if proper techniques are not followed. Understanding these potential problems allows for proactive avoidance.
- Warping: Caused by improper fastening, insufficient ventilation, or exposure to moisture. Prevention involves using the correct fasteners, ensuring proper spacing, and maintaining adequate ventilation.
- Cracking: Can result from using the wrong fasteners, driving fasteners too deeply, or applying excessive force. Pre-drilling and using the appropriate fasteners helps avoid cracking.
- Water Damage: Occurs from inadequate sealing around windows, doors, and other penetrations. Using high-quality caulking and sealant and ensuring proper flashing are crucial for preventing water damage.
- Uneven Installation: Results from poor planning and inaccurate measurements. Careful planning, precise measurements, and using a level are essential for a clean, even installation.
Post-Installation Care and Maintenance: Hardie Board Installers Near Me
Proper care and maintenance are crucial for preserving the beauty and longevity of your Hardie board siding. Neglecting this can lead to premature deterioration and costly repairs. By following a simple maintenance schedule and addressing issues promptly, you can ensure your siding remains in excellent condition for years to come.
Hardie board siding, while durable, is still susceptible to damage from the elements and other external factors. Regular inspection and timely maintenance are key to preventing costly repairs and maintaining the aesthetic appeal of your home’s exterior. This section Artikels a proactive approach to ensure your investment remains protected.
Cleaning and Washing Hardie Board Siding
Regular cleaning removes dirt, mildew, and other debris that can accumulate over time. For routine cleaning, a garden hose with a strong spray nozzle is usually sufficient. For more stubborn stains or mildew growth, a solution of mild detergent and water can be applied, followed by thorough rinsing. Avoid using high-pressure washers, as these can damage the siding’s surface. Always allow the siding to completely dry after cleaning to prevent moisture buildup.
Addressing Common Problems
Several issues can arise with Hardie board siding, but many are easily addressed with timely intervention. Cracks or damage from impacts should be repaired promptly to prevent further damage. Small cracks can often be filled with a suitable caulking compound, while more extensive damage may require replacing the affected panel. Paint chipping or fading is common and can be addressed through repainting, following the manufacturer’s recommended procedures. Mildew can be removed with a diluted bleach solution (follow product instructions carefully), and persistent issues may indicate a moisture problem requiring professional attention.
Scheduled Inspection and Maintenance
A regular inspection schedule helps to catch and address minor issues before they become major problems, saving you time and money in the long run.
| Task | Frequency | Details | Notes |
|---|---|---|---|
| Visual Inspection | Annually (Spring/Fall) | Check for cracks, damage, loose panels, or signs of mildew. | Pay close attention to areas prone to moisture accumulation, such as corners and around windows. |
| Cleaning | Annually (Spring) | Wash siding with a garden hose and mild detergent if needed. | Avoid high-pressure washers. |
| Caulking/Repair | As needed | Repair any cracks or damaged areas with appropriate caulking or patching materials. | Consult a professional for significant damage. |
| Repainting | Every 5-10 years (depending on climate and paint type) | Repaint siding to maintain appearance and protect from the elements. | Follow manufacturer’s instructions for paint selection and application. |
Visual Examples of Hardie Board Installations
Seeing is believing, and when it comes to choosing the right Hardie board siding for your home, visual examples are invaluable. This section will showcase different styles, colors, textures, and installation techniques to help you envision the final product. We’ll explore how these choices impact the overall aesthetic and complement various architectural styles.
Different styles and designs of Hardie board siding installations offer a wide array of options to personalize your home’s exterior. The choices you make regarding color, texture, and installation technique significantly influence the final look.
Hardie Board Siding Styles and Designs
Let’s explore some visual examples of Hardie board installations, focusing on the interplay of color, texture, and pattern.
- Classic Farmhouse: Imagine a two-story farmhouse with creamy white Hardie plank siding, accented by dark brown trim around the windows and doors. The texture is smooth, giving a clean, sophisticated look. A subtle vertical pattern is created by the slightly overlapping planks. This style evokes a sense of timeless elegance.
- Modern Minimalist: Picture a sleek, modern home clad in deep gray Hardie cement board. The texture is smooth, almost matte, creating a sophisticated, contemporary feel. The siding is installed in a clean, horizontal pattern, emphasizing the home’s linear design. Minimal trim is used, maintaining a clean, uncluttered look.
- Rustic Cottage: Visualize a charming cottage with warm, earthy-toned Hardie shingles. The texture is rough and slightly textured, mimicking the look of natural wood shakes. The shingles are installed in an overlapping pattern, creating a rustic, inviting aesthetic. The color palette might include shades of brown, beige, and gray, blending seamlessly with the natural surroundings.
- Coastal Contemporary: Envision a beachfront home with light blue Hardie lap siding. The smooth texture reflects light beautifully, creating a bright and airy feel. The lap siding is installed horizontally, providing a clean and modern look that complements the coastal setting. White trim accentuates the blue siding, evoking the feeling of the sea and sky.
Impact of Installation Techniques on Visual Appeal
The way Hardie board is installed directly affects the final look. Different techniques create unique visual effects.
- Horizontal vs. Vertical Installation: Horizontal installation creates a classic, traditional look, while vertical installation adds a modern, contemporary feel. Horizontal siding emphasizes the width of the house, while vertical siding can make it appear taller and more slender.
- Overlapping vs. Butt-Joint Installation: Overlapping planks, common with lap siding and shingles, create depth and texture. Butt-joint installation, often seen with panel siding, results in a cleaner, more streamlined look. The choice depends on the desired aesthetic – rustic versus modern.
- Use of Trim and Accent Pieces: Strategic use of trim pieces in contrasting colors or textures can dramatically enhance the visual appeal of Hardie board siding. Adding window and door casings, corner boards, and decorative accents can create visual interest and break up large expanses of siding.
Visual Impact of Hardie Board Colors and Textures on Home Styles
The color and texture of Hardie board significantly influence the overall aesthetic of a home, complementing or contrasting with its architectural style.
- Light Colors on Victorian Homes: Light-colored Hardie board, such as creamy white or pale gray, can soften the ornate details of a Victorian home, creating a balanced and elegant look. The smooth texture complements the intricate architectural features.
- Dark Colors on Modern Homes: Dark-colored Hardie board, such as charcoal gray or deep brown, can emphasize the clean lines and geometric shapes of a modern home, creating a dramatic and sophisticated look. The smooth texture enhances the minimalist aesthetic.
- Earthy Tones on Ranch Homes: Earthy tones like beige, brown, and taupe can create a warm and inviting atmosphere for ranch-style homes. A textured finish can mimic natural materials, blending seamlessly with the surrounding landscape.
Concluding Remarks

Source: advanceroofingllc.com
Finding reliable Hardie board installers near you doesn’t have to be a headache. By carefully considering the factors discussed—from online reviews to contract details and post-installation care—you can confidently choose a contractor who will deliver exceptional results. Remember, a little research goes a long way in ensuring a successful and beautiful Hardie board installation for your home.
Questions and Answers
What is Hardie board?
Hardie board is a type of fiber cement siding known for its durability, weather resistance, and low maintenance.
How long does Hardie board installation typically take?
The timeframe depends on the project size and complexity, but it can range from a few days to several weeks.
Do I need a permit for Hardie board installation?
Check with your local building department; permits are often required for exterior renovations.
Can I install Hardie board myself?
While possible, professional installation is recommended to ensure proper application and warranty validity.
What should I do if I find damage to my Hardie board after installation?
Contact your installer immediately; most warranties cover defects in materials and workmanship.
Comments are closed.