Cedar Siding A Comprehensive Guide
Cedar siding offers a timeless and elegant look for your home’s exterior. This guide dives into everything you need to know, from choosing the right type of cedar and understanding installation techniques to maintaining its beauty and considering the environmental impact. We’ll cover various cedar profiles, installation methods, maintenance schedules, cost comparisons, and design considerations to help you make informed decisions for your project.
Whether you’re a seasoned DIYer or planning to hire a contractor, understanding the nuances of cedar siding will ensure a successful and visually stunning outcome. We’ll explore the differences between Western Red Cedar, Eastern White Cedar, and Alaskan Yellow Cedar, helping you select the best option based on your budget, climate, and aesthetic preferences. Get ready to learn about the unique characteristics of each cedar type, installation best practices, and long-term care strategies to protect your investment.
Types of Cedar Siding
Cedar siding offers a beautiful and durable exterior cladding option for homes. Its natural beauty, resistance to rot and insects, and relatively easy installation make it a popular choice among homeowners. Understanding the different types of cedar siding profiles and cedar species will help you choose the best option for your project.
Cedar Siding Profiles
Several distinct profiles are available in cedar siding, each offering a unique aesthetic and performance characteristic. The choice often depends on personal preference, architectural style, and budget.
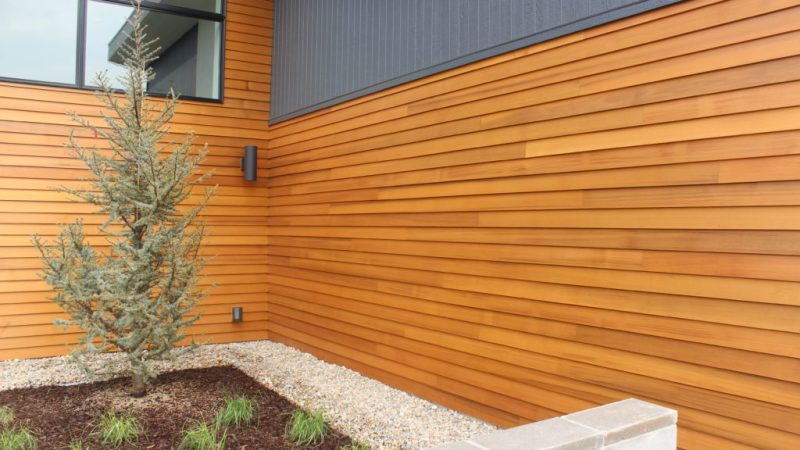
- Bevel Siding: This classic profile features a beveled edge, creating a slightly overlapping appearance. It’s typically available in widths ranging from 4 to 8 inches and thicknesses from 3/8 to 1/2 inch. Bevel siding offers a clean, traditional look and is suitable for a wide range of architectural styles.
- Channel Siding: Characterized by a grooved channel running along its length, channel siding provides a more rustic and textured appearance compared to bevel siding. Dimensions are similar to bevel siding, with widths typically ranging from 4 to 6 inches. Its deep grooves can help shed water effectively.
- Shiplap Siding: This profile features a rabbeted edge, creating a tight, overlapping joint that enhances weather resistance. Shiplap siding often has a wider board width than bevel or channel siding, providing a more modern and contemporary look. Common widths range from 6 to 12 inches.
- Board and Batten Siding: This style uses wider vertical boards (boards) with narrower strips (battens) covering the seams between them. This creates a vertical, linear look. Board widths vary considerably, and the batten width is usually narrower than the boards. Board and batten offers a strong, traditional look often associated with farmhouses and rustic designs.
Cedar Species Comparison
Three primary cedar species are commonly used for siding: Western Red Cedar, Eastern White Cedar, and Alaskan Yellow Cedar. Each offers a unique combination of durability, appearance, and cost.
Western Red Cedar is widely considered the most popular choice due to its strength, natural beauty, and relatively low cost. It exhibits excellent resistance to rot and insects. Eastern White Cedar is a slightly less durable option, though still quite resistant to decay. It’s often lighter in color than Western Red Cedar. Alaskan Yellow Cedar is the most durable and weather-resistant of the three, boasting exceptional longevity but commanding a higher price.
Cedar Siding: Properties and Costs
The following table summarizes the key characteristics of different cedar siding types, considering appearance, durability, and cost. Note that cost can vary significantly based on factors like grade, thickness, and regional availability.
| Siding Type | Appearance | Durability | Cost |
|---|---|---|---|
| Bevel Siding | Clean, traditional | Medium-High | Medium |
| Channel Siding | Rustic, textured | Medium | Medium |
| Shiplap Siding | Modern, contemporary | Medium-High | Medium-High |
| Board and Batten | Vertical, linear, rustic | Medium-High | Medium-High |
Cedar Siding Installation
Installing cedar siding is a rewarding project that can significantly enhance your home’s curb appeal and value. Proper installation, however, requires careful attention to detail and adherence to best practices to ensure longevity and weather resistance. This section details the process, from wall preparation to final fastening.
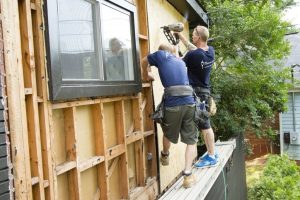
Wall Preparation for Cedar Siding
Before installing cedar siding, thorough wall preparation is crucial. This involves several key steps: First, ensure the existing wall structure is sound and free from rot or damage. Repair any issues before proceeding. Next, install appropriate sheathing, typically plywood or OSB, to create a smooth, even surface for the siding. This sheathing provides a solid base and helps distribute weight. Then, install a water-resistant barrier, such as housewrap, over the sheathing. This barrier prevents moisture from penetrating the wall assembly. Finally, install flashing around windows, doors, and other penetrations to prevent water from entering these vulnerable areas. Flashing should overlap properly and extend beyond the siding to ensure effective water management.
Fastening Cedar Siding
There are several methods for fastening cedar siding, each with its advantages and disadvantages. Exposed nails offer a straightforward approach, but require careful selection of nail size and placement to avoid splitting the wood. A common pattern involves spacing nails approximately 6 inches apart and staggering them from course to course. Hidden fasteners, such as concealed clips or stainless steel screws, provide a cleaner, more aesthetically pleasing finish, though they can be more time-consuming to install. The choice of fastening method often depends on the siding profile and personal preference. For example, using stainless steel screws allows for adjustments during installation and reduces the risk of splitting the wood, particularly with thicker cedar boards.
Step-by-Step Cedar Siding Installation Guide
This guide article is the installation process, assuming proper wall preparation has already been completed.
- Step 1: Establish a Starting Point. Begin at a corner or a prominent feature of your house. Establish a level starting line using a chalk line and level to ensure consistent siding alignment.
- Step 2: Install the First Course. Position the first course of cedar siding, ensuring it is level and plumb. Secure it using the chosen fastening method (nails or hidden fasteners). Maintain a consistent gap between the bottom of the siding and the foundation or ground for proper drainage.
- Step 3: Install Subsequent Courses. Install subsequent courses, overlapping each course according to manufacturer’s specifications and maintaining consistent spacing between boards. This creates a weather-tight barrier. Use a level and straightedge to ensure vertical alignment. Visualize this as stacking building blocks, maintaining a straight line both vertically and horizontally.
- Step 4: Cut and Fit Around Obstructions. Carefully measure and cut siding around windows, doors, and other obstructions. Use a sharp utility knife or circular saw for clean cuts. This requires precise measurements and careful fitting to maintain a seamless appearance.
- Step 5: Install Corner Boards and Trim. Install corner boards and trim pieces to finish the installation. Ensure these pieces are properly fastened and aligned. These finishing pieces enhance the aesthetic appeal and provide a clean, professional finish.
- Step 6: Final Inspection. Once installation is complete, conduct a final inspection to check for any gaps, misalignments, or damaged boards. Make any necessary repairs before moving on.
Cedar Siding Maintenance and Care
Keeping your cedar siding looking its best and extending its lifespan requires regular maintenance. Cedar, while naturally durable, is susceptible to damage from the elements and pests if neglected. Proper cleaning and preventative measures are key to preserving its beauty and avoiding costly repairs down the line. This section offers a simple maintenance plan to keep your cedar siding in top condition.
Regular cleaning is crucial for preventing the buildup of dirt, debris, and organic matter that can harbor mold, mildew, and insects. The type of cleaning you do will depend on the level of soiling and the condition of your siding. Preventative measures, such as addressing minor issues promptly, can significantly reduce the need for extensive repairs in the future. Remember to always check the weather forecast before undertaking any exterior cleaning tasks, as rain can wash away cleaning solutions before they have a chance to work effectively.
Cleaning Cedar Siding
Cleaning your cedar siding involves a straightforward process. For routine cleaning, a simple solution of mild detergent and water, applied with a soft-bristled brush, is often sufficient. Rinse thoroughly with clean water afterward. For more stubborn stains or mildew, a pressure washer can be effective, but use caution to avoid damaging the wood. Always start with a low pressure setting and test a small, inconspicuous area first. For particularly tough mildew, a solution of bleach and water (a ratio of 1 part bleach to 3 parts water) may be necessary, but be sure to wear protective gear and rinse thoroughly. Never use harsh chemicals or abrasive cleaners, as these can damage the cedar’s finish and natural oils. After cleaning, allow the siding to air dry completely.
Preventing Mold, Mildew, and Insect Infestation
Mold and mildew thrive in damp environments. Good ventilation around your home is crucial. Ensure proper drainage around the foundation to prevent water from pooling against the siding. Regularly inspect your siding for any signs of damage, such as cracks or loose boards. Repairing these promptly prevents water penetration. Insect infestation can be prevented by regularly inspecting for signs of activity, such as holes or insect droppings. Treating any infestations quickly with appropriate insecticides can prevent widespread damage. Consider using insect repellent paints or sealants for added protection. Properly sealing any gaps or cracks around windows and doors will help prevent insects from entering your home.
Cedar Siding Maintenance Schedule
Following a regular maintenance schedule will help keep your cedar siding in optimal condition. This schedule assigns articles tasks to be performed annually, biannually, and as needed. Adjust the frequency based on your climate and the condition of your siding.
- Annual Tasks: Inspect siding for damage; clean siding with mild detergent and water; inspect for signs of insect infestation; trim overhanging branches.
- Biannual Tasks: Inspect for mold and mildew; treat any mildew with a bleach solution if necessary; check caulking around windows and doors; re-caulk as needed.
- As Needed Tasks: Repair damaged siding; replace rotten or damaged boards; treat insect infestations; apply a wood sealant or preservative if necessary (check manufacturer recommendations for frequency).
Cedar Siding Cost and Budget
Planning a cedar siding project requires careful consideration of the costs involved. The total expense will depend on several interacting factors, making accurate budgeting crucial for a successful project. Understanding these factors will allow you to make informed decisions and avoid unexpected financial burdens.
Factors Influencing Cedar Siding Costs
Several key factors significantly influence the overall cost of cedar siding. Material costs vary based on the type of cedar (e.g., Western Red Cedar, Eastern White Cedar), grade (e.g., clear, select, standard), and thickness. Higher grades and thicker boards generally command higher prices. Labor costs are another major component, fluctuating depending on the project’s complexity, the region’s labor rates, and the contractor’s experience. Regional variations in material availability and labor costs can lead to substantial price differences. For instance, a project in a remote area might involve higher transportation costs for materials, increasing the overall expense. Finally, the project’s scope—including the house’s size and the complexity of the design—plays a vital role in determining the final cost. A larger house with intricate detailing will naturally cost more than a smaller, simpler one.
Cedar Siding Cost Comparison with Other Materials
Choosing the right siding material involves a careful evaluation of initial cost, long-term maintenance, and lifespan. Cedar siding offers a unique blend of aesthetics and durability, but it’s essential to compare it to alternatives like vinyl and fiber cement to make an informed decision. The following table provides a comparative analysis, keeping in mind that actual costs can vary significantly based on factors discussed previously.
| Material | Initial Cost (per sq ft, estimate) | Maintenance Cost (per year, estimate) | Lifespan (years) |
|---|---|---|---|
| Cedar Siding | $8-$20 | $100-$300 | 30-50+ |
| Vinyl Siding | $4-$8 | $50-$100 | 20-30 |
| Fiber Cement Siding | $6-$15 | $50-$150 | 30-50 |
*Note: These are estimates and actual costs can vary widely based on location, project specifics, and contractor choice.*
Creating a Cedar Siding Budget
Creating a realistic budget is crucial for successful project management. This involves careful estimation of material quantities, labor costs, and contingency planning. Start by accurately measuring the area to be sided. Consider adding 10-15% extra for waste and unforeseen issues. Obtain multiple quotes from reputable contractors, comparing their labor rates and project timelines. Remember to factor in permits, inspections, and potential removal of existing siding. A crucial aspect is contingency planning; allocate 10-20% of the total estimated cost to cover unexpected expenses, such as material price fluctuations or unforeseen repair needs. For example, if the initial estimate is $10,000, a contingency of $1,000-$2,000 should be included. This ensures that budget overruns don’t derail the project. Finally, break down the budget into phases—material purchase, labor, permits, etc.—for better tracking and control. This phased approach allows for better financial management throughout the project lifecycle.
Environmental Impact of Cedar Siding
Cedar siding, while aesthetically pleasing and durable, carries an environmental footprint that’s important to understand. Its impact stems from various stages of its lifecycle, from harvesting the trees to its eventual disposal. Choosing cedar siding involves considering its sustainability and comparing it to alternative materials.
The environmental impact of cedar siding is multifaceted. Sustainable forestry practices are key to minimizing its negative effects. Responsible harvesting ensures that cedar trees are replaced, maintaining forest health and biodiversity. The processing of cedar, including milling and treatment, also contributes to the overall environmental footprint, with energy consumption and waste generation playing significant roles. Finally, the disposal or recycling of cedar siding at the end of its lifespan is another factor to consider.
Sustainable Forestry Practices and Cedar Sourcing
Responsible forestry is paramount to minimizing the environmental impact of cedar siding. Sustainable harvesting methods, such as selective logging, ensure that only mature trees are harvested, leaving younger trees to grow and maintain the forest ecosystem. Certification programs, like the Forest Stewardship Council (FSC), assure that cedar is sourced from responsibly managed forests. These certifications verify that harvesting practices protect biodiversity, soil health, and water resources. Without such practices, cedar harvesting can lead to deforestation, habitat loss, and soil erosion. For example, a company certified by the FSC would demonstrate sustainable practices through meticulous record-keeping, regular forest audits, and a commitment to reforestation efforts.
Comparison with Other Siding Options
Cedar siding’s environmental impact must be weighed against alternatives. Vinyl siding, for instance, is manufactured from petroleum products, contributing to greenhouse gas emissions. While it requires less maintenance and lasts a long time, its production and disposal are less environmentally friendly than sustainably harvested cedar. Fiber cement siding, made from cement, sand, and cellulose fibers, is a more sustainable alternative. It’s durable and requires minimal maintenance, but its production involves significant energy consumption. Ultimately, the best choice depends on a holistic assessment of material sourcing, manufacturing processes, lifespan, and end-of-life management. A life-cycle assessment comparing these materials would reveal a more complete picture of their relative environmental impacts.
Cedar Siding Processing and Waste Management
The processing of cedar into siding involves energy consumption for milling and potentially for treatment with preservatives. Minimizing waste during this process is crucial. Efficient milling techniques reduce scrap wood, and the use of recycled materials in the manufacturing process can further lessen the environmental impact. At the end of its life, cedar siding can be disposed of in landfills, though its biodegradability makes it a less problematic material compared to some alternatives. However, responsible disposal practices, such as recycling or using the reclaimed wood for other purposes, should be prioritized. For instance, reclaimed cedar siding could be repurposed for interior projects or used as mulch.
Design Considerations for Cedar Siding
Cedar siding offers a unique blend of natural beauty and durability, making it a versatile choice for a wide range of architectural styles and design preferences. Its inherent texture and color variations allow for creative expression, transforming a home’s exterior from ordinary to extraordinary. Careful consideration of design elements will ensure the cedar siding complements the overall aesthetic and enhances the home’s curb appeal.
Cedar Siding and Architectural Styles
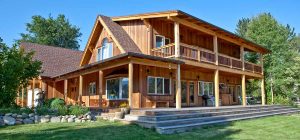
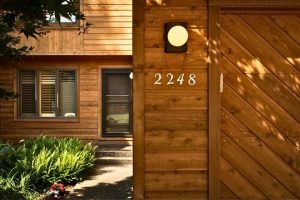
Cedar siding’s adaptability allows it to seamlessly integrate into various architectural styles. For traditional homes, the natural warmth of cedar, particularly when stained in earthy tones like deep browns or warm grays, creates a classic and inviting look. Imagine a colonial-style home with wide clapboard cedar siding, accented by white trim around the windows and doors – a timeless combination. Conversely, for modern homes, cedar can be used in a more minimalist approach. Horizontal siding in a clean, natural finish, perhaps with subtle color variations, can provide a contemporary feel. Think of a sleek, modern farmhouse with smooth, narrow cedar planks, showcasing the wood’s natural grain and texture. For rustic designs, the rough-hewn texture of cedar shakes or shingles, possibly left unstained to weather naturally to a silvery gray, perfectly complements the rugged charm of a cabin or mountain retreat. This creates a strong visual connection to the surrounding natural environment.
Cedar Siding in Exterior Design Elements
Beyond the main siding, cedar can be strategically used to enhance various exterior design elements. As accents, vertical cedar planks can add visual interest to a facade, perhaps framing a doorway or creating a striking feature wall. Cedar trim, in contrasting colors or finishes, can define architectural details, providing crisp lines and highlighting windows, doors, and rooflines. Soffits, the underside of roof overhangs, can be clad in cedar to add a cohesive and aesthetically pleasing touch, complementing the main siding and creating a visually integrated exterior. Cedar can also be used effectively for porch ceilings, adding a touch of rustic charm or sophisticated elegance depending on the finish and design. The use of cedar in these secondary elements creates a more unified and visually appealing exterior.
Cedar Siding Color Schemes and Staining Options
The natural beauty of cedar can be enhanced or subtly altered through staining. A clear sealer will protect the wood while allowing its natural color variations to shine through, resulting in a warm, inviting look. For a more dramatic effect, darker stains, such as deep browns, rich reds, or charcoal grays, can create a sophisticated and modern aesthetic. These darker stains can add depth and shadow to the siding, highlighting the texture and grain of the wood. Lighter stains, such as light gray or beige, can create a more airy and relaxed feel, particularly well-suited for homes in brighter climates. A two-tone scheme, using different shades of stain on the main siding and trim, can also add visual interest and create a striking contrast. For instance, a darker stain on the main siding paired with a lighter stain on the trim can emphasize the architectural details. The choice of stain should consider the overall architectural style of the house and the surrounding landscape to create a harmonious and visually appealing exterior. Remember to always choose high-quality, exterior-grade stains designed to protect the cedar from the elements.
Final Summary
From selecting the perfect cedar siding profile to understanding the long-term maintenance requirements, this guide has equipped you with the knowledge to embark on your siding project with confidence. Remember, the beauty and longevity of your cedar siding depend on careful planning, proper installation, and regular maintenance. By following the tips and advice provided, you can enjoy the natural charm and enduring quality of cedar siding for years to come. So, whether you’re aiming for a rustic cabin feel or a sleek modern aesthetic, let cedar siding enhance your home’s curb appeal and add value to your property.
Quick FAQs
What is the lifespan of cedar siding?
With proper maintenance, cedar siding can last 30-50 years or even longer.
Can I paint cedar siding?
Yes, but it’s generally recommended to let the natural beauty of the wood show through with stain rather than paint. Paint can trap moisture.
How often should I clean my cedar siding?
At least once a year, using a soft brush and mild detergent. Pressure washing should be done cautiously and infrequently to avoid damaging the wood.
Is cedar siding fire-resistant?
Cedar is naturally more resistant to fire than some other materials, but it’s not fireproof. Treating it with fire-retardant chemicals can enhance its fire resistance.
How do I deal with insect infestations in cedar siding?
Regular inspection and prompt treatment with appropriate insecticides are crucial. Contact a pest control professional for severe infestations.
Comments are closed.