Cedar Siding Replacement A Complete Guide

Cedar siding replacement isn’t just about slapping on new boards; it’s about transforming your home’s exterior. This guide dives into the entire process, from cost analysis and material selection to installation techniques and long-term maintenance. We’ll cover everything you need to know to make informed decisions and achieve stunning results, whether you’re tackling a small repair or a full-scale renovation.
We’ll explore the different types of cedar siding available, their pros and cons, and how to choose the best option for your climate and budget. From understanding the nuances of installation to mastering maintenance techniques that extend the life of your siding, this guide provides a comprehensive approach to a successful cedar siding replacement project.
Cost Analysis of Cedar Siding Replacement
Source: directcedarsupplies.com
Replacing your cedar siding is a significant investment, but understanding the costs involved can help you budget effectively and make informed decisions. This section breaks down the various factors influencing the overall expense, from material selection to labor costs and project scope.
Cedar Siding Material Costs
The cost of cedar siding itself varies considerably depending on the grade and type. Clear cedar, with minimal knots and a uniform appearance, commands a higher price than knotty cedar, which features more knots and a more rustic look. The thickness of the siding also plays a role; thicker boards are more durable but more expensive. Expect to pay anywhere from $5 to $20 per square foot for the materials alone, with clear cedar at the higher end of the range. This doesn’t include additional costs for trim, flashing, or other necessary components.
Labor Costs for Cedar Siding Replacement
Labor costs represent a substantial portion of the total project expense. The hourly rate for skilled siding installers varies by region and the complexity of the job. You can anticipate paying anywhere from $40 to $80 per hour, or even more in some areas. The total labor cost depends heavily on the size of your home’s exterior and the amount of detail work involved. A simple replacement on a small house might take a couple of days, while a larger, more complex project could take several weeks.
Factors Influencing Overall Cost
Several factors beyond material and labor significantly influence the final cost. The size of your home is a major determinant; larger homes naturally require more materials and labor. Your location also plays a role; labor and material costs vary regionally due to supply and demand. The condition of your existing siding affects the cost as well. Extensive damage may require more extensive repairs or even full replacement, driving up the price. Finally, the complexity of the job, such as the presence of intricate architectural details or difficult-to-reach areas, increases both labor time and cost.
Cost Comparison: Replacement Methods
The table below compares the costs associated with different approaches to cedar siding replacement. These figures are estimates and can vary depending on the factors discussed above.
| Replacement Method | Material Cost (per sq ft) | Labor Cost (per sq ft) | Total Estimated Cost (per sq ft) |
|---|---|---|---|
| Full Replacement (Clear Cedar) | $15 – $20 | $10 – $15 | $25 – $35 |
| Full Replacement (Knotty Cedar) | $8 – $12 | $10 – $15 | $18 – $27 |
| Repair (Minor Damage) | $5 – $10 | $5 – $10 | $10 – $20 |
| Repair (Significant Damage) | $10 – $15 | $10 – $20 | $20 – $35 |
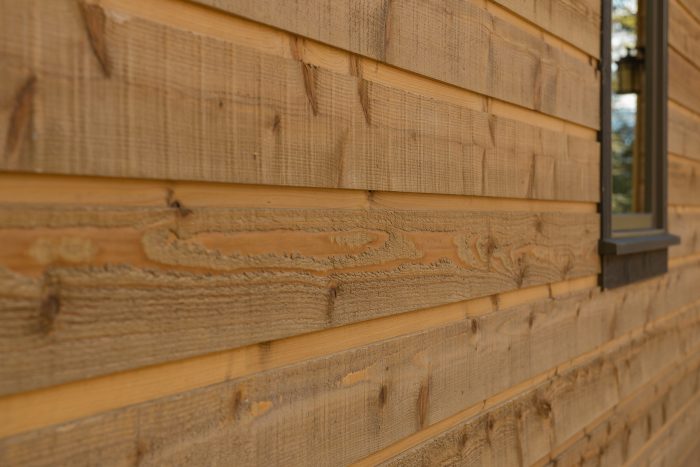
Materials and Selection for Cedar Siding Replacement
Source: longhousecedar.com
Choosing the right cedar siding for your replacement project is crucial for both aesthetics and longevity. This section details the factors to consider when selecting materials, ensuring your investment delivers lasting beauty and performance. Understanding cedar grades, profiles, and environmental impact will guide you towards a well-informed decision.
Cedar Siding Grades and Climate Suitability
Cedar siding is graded based on knot density, wood quality, and appearance. Higher grades, such as Clear and Premium, have fewer knots and a more uniform appearance, making them ideal for prominent areas or projects demanding a flawless finish. These grades generally command a higher price. Lower grades, such as #1 and #2, contain more knots and variations in color and grain, but are still suitable for many applications, offering a more rustic look and a more budget-friendly option. The choice of grade should also consider the climate. In harsh, wet climates, a higher grade with tighter grain might offer better protection against moisture damage. In milder climates, a lower grade could be perfectly acceptable, potentially offering cost savings without compromising longevity.
Cedar Siding Profiles and Maintenance
Several profiles are available, each with unique aesthetic qualities and maintenance needs. Bevel siding, with its characteristic angled edge, provides a classic, clean look. Clapboard siding, with its overlapping design, offers excellent weather protection and is known for its durability. Other profiles, such as channel siding or shingle siding, provide additional design options. Bevel and clapboard siding are relatively low-maintenance, requiring periodic cleaning and occasional staining or sealing to protect against moisture and UV damage. However, the frequency of maintenance depends on factors such as climate and sun exposure. For instance, siding in a sunny, coastal region will require more frequent maintenance than siding in a sheltered, inland area.
Environmental Impact of Cedar Siding, Cedar Siding Replacement
Sustainable sourcing is key when choosing cedar siding. Look for certifications from organizations like the Forest Stewardship Council (FSC) which ensure the wood comes from responsibly managed forests. This promotes responsible forestry practices and minimizes environmental impact. Cedar is a naturally durable material, but proper disposal is important at the end of its life. Check with your local waste management facilities for guidelines on recycling or responsible disposal options. In some areas, reclaimed cedar siding might be available, offering a sustainable alternative and a unique aesthetic. Reclaimed cedar often shows a beautiful patina from years of weathering, adding character to your home.
Key Considerations When Selecting Cedar Siding
Before making your final decision, consider these key factors:
- Budget: Cedar siding prices vary significantly based on grade, profile, and quantity.
- Climate: Choose a grade and profile appropriate for your local weather conditions.
- Aesthetic preferences: Select a profile and finish that complements your home’s architectural style.
- Maintenance requirements: Consider your willingness and ability to maintain the siding.
- Sustainability: Opt for sustainably sourced cedar and plan for responsible disposal.
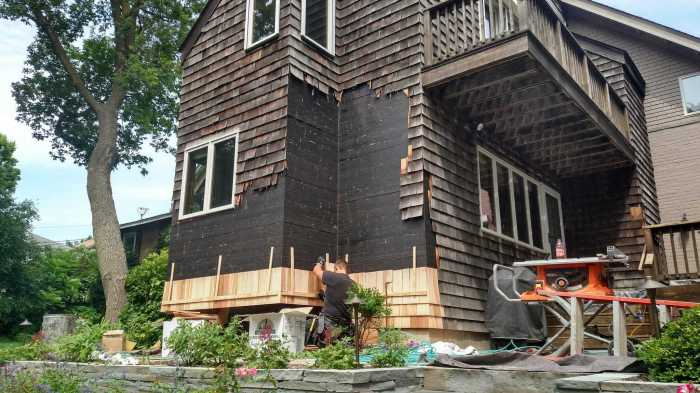
Installation Process and Techniques for Cedar Siding Replacement
Replacing cedar siding is a significant undertaking, requiring careful planning and execution. This section details the step-by-step process, from removing the old siding to installing the new, ensuring a long-lasting and aesthetically pleasing result. Proper preparation and technique are crucial for a professional-looking finish.
Removing Old Cedar Siding
Removing the old siding involves careful work to avoid damaging the underlying structure. Begin by removing any trim pieces, such as window and door casings, carefully noting their position for later reinstallation. Next, start at the bottom of the wall and work your way up, removing one course of siding at a time. Pry gently with a pry bar, working from the bottom edge to avoid damaging the remaining siding. Dispose of the old siding responsibly, recycling where possible. Inspect the sheathing for any damage during removal. Any damaged areas should be repaired before installing new siding.
Preparing the Wall Surface
Before installing the new siding, thoroughly inspect the wall surface for any damage. Repair any damaged sheathing, replacing rotten or damaged wood. Ensure all nails and staples from the old siding are removed. Clean the surface of any loose debris, dirt, or old caulking. Applying a coat of primer to the bare wood will help prevent moisture damage and provide a better surface for the new siding to adhere to. This step is critical for preventing future problems. For example, failing to properly prepare the surface can lead to rot and premature failure of the new siding.
Cutting and Fitting Cedar Siding
Accurate cutting and fitting are essential for a professional finish. Use a sharp circular saw or miter saw to cut the cedar siding to the correct length. Measure carefully and allow for proper overlap between boards. For corners and around windows and doors, you may need to miter the ends of the boards at a 45-degree angle to create a clean, seamless look. Use a pencil to mark cutting lines on the cedar siding, ensuring accuracy. Pre-drilling pilot holes before fastening will prevent splitting.
Fastening Cedar Siding
Cedar siding can be fastened using either nails or screws. Using galvanized nails or exterior-grade screws is crucial to prevent rust and corrosion. When nailing, use a nail gun for faster installation and ensure the nails are driven straight and flush with the surface of the siding, but not so deep as to damage the wood. Alternatively, using screws allows for easier adjustment and removal if necessary. Screw placement should be consistent, and screws should be countersunk slightly below the surface of the siding. Regardless of your chosen method, avoid overdriving fasteners, which can split the cedar. A consistent fastening pattern is essential for a professional appearance. For instance, using a pattern of two nails per board at a specific distance apart helps maintain a uniform look.
Maintenance and Longevity of Cedar Siding
Source: sidepro.com
Proper maintenance is key to extending the life and beauty of your cedar siding. Regular cleaning and preventative treatments will protect your investment and prevent costly repairs down the line. Neglecting maintenance can lead to premature aging, damage from the elements, and potential structural issues. This section offers a practical maintenance plan to keep your cedar siding looking its best for years to come.
Routine Maintenance Tasks
Regular cleaning is the foundation of cedar siding maintenance. At least once a year, use a soft-bristled brush and a gentle solution of mild detergent and water to remove dirt, debris, and loose algae. Avoid high-pressure washers, as they can damage the wood. For stubborn stains, consider using a specialized wood cleaner designed for cedar. Inspect the siding carefully during cleaning, noting any areas of concern. Pay close attention to areas prone to moisture buildup, such as near the ground or around windows and doors.
Identifying and Addressing Common Problems
Cedar siding, while durable, is susceptible to certain problems. Rot is a significant concern, often caused by prolonged moisture exposure. Look for soft, spongy areas, discoloration, or a musty odor. Infestation by insects like carpenter ants or termites can also weaken the wood. Check for small holes, tunnels, or frass (insect droppings). Weathering, including fading and cracking, is a natural process, but excessive weathering can be mitigated with proper maintenance. Regular inspections will allow you to address these issues promptly, preventing further damage. Repairing rot often involves replacing affected sections of siding. Insect infestations may require professional pest control treatment.
Effectiveness of Preservation Treatments
Cedar siding benefits greatly from the application of protective treatments. Stains offer both color enhancement and protection against UV rays, preventing fading and weathering. Sealants provide a water-repellent barrier, minimizing moisture absorption and reducing the risk of rot. Oil-based stains penetrate the wood, offering deeper protection, while water-based stains are easier to clean up. The choice between stain and sealant, or a combination of both, depends on your preferences and the level of protection desired. Proper application is crucial for effectiveness; follow the manufacturer’s instructions carefully. Reapplication is typically recommended every few years, depending on the product and environmental conditions.
Recommended Maintenance Schedule
| Task | Frequency | Details | Notes |
|---|---|---|---|
| Cleaning | Annually (Spring or Fall) | Soft brush, mild detergent, water. | Avoid high-pressure washers. |
| Inspection | Annually (during cleaning) | Check for rot, insect damage, and weathering. | Address issues promptly. |
| Stain/Sealant Application | Every 2-3 years | Apply according to manufacturer’s instructions. | Consider oil-based for deeper protection, water-based for easier cleanup. |
| Repair/Replacement | As needed | Replace rotted or damaged sections. | Consult a professional for extensive repairs. |
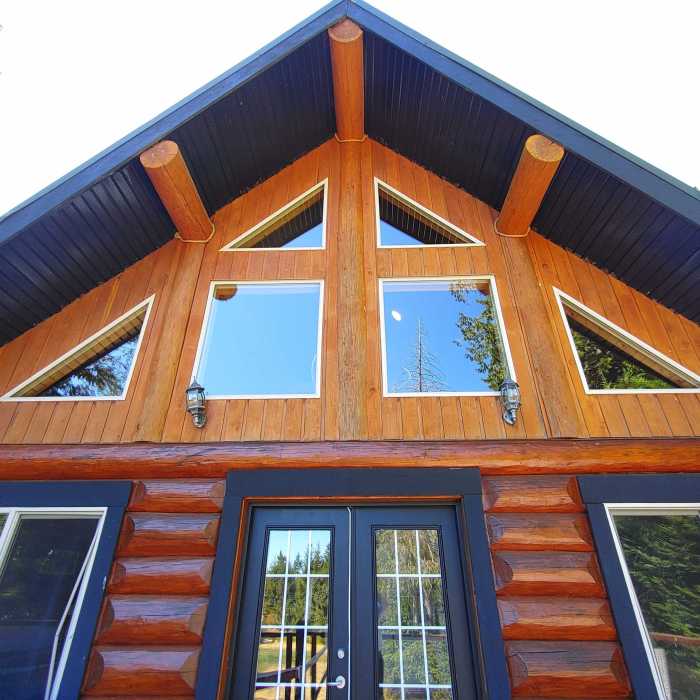
Visual Examples of Cedar Siding Replacement Projects
Seeing is believing, and when it comes to cedar siding replacement, the transformation can be truly remarkable. These examples showcase the potential for enhancing your home’s curb appeal and value through careful planning and execution. We’ll look at projects demonstrating a complete overhaul, a unique design feature, and a clever solution to a common installation problem.
A Complete Transformation: From Drab to Fab
This project involved a 1950s ranch-style home with aging, weathered cedar siding that was showing significant signs of decay and water damage. The original siding was dark brown, almost black in places, and uneven in color due to years of sun exposure and neglect. The homeowners opted for a lighter, more modern look. They chose clear, vertical-grain Western Red Cedar, which was pre-primed and then painted a warm, light gray. The installation team meticulously removed the old siding, ensuring proper disposal of the waste. New sheathing was installed where necessary, addressing any underlying moisture issues. The new siding was installed with precision, maintaining consistent gaps and avoiding any noticeable inconsistencies. The final result was a stunning transformation. The light gray siding complemented the home’s architectural style, creating a fresh, clean, and inviting aesthetic. The contrast between the before and after photos was dramatic; the home went from looking tired and dated to feeling bright, modern, and well-maintained.
Unique Design Element: A Cedar Accent Wall
This project focused on a modern farmhouse design. The main body of the house was clad in a sleek, dark gray fiber cement siding. However, to add visual interest and a touch of rustic charm, the homeowners decided to incorporate a striking cedar accent wall. They selected a high-quality, clear-grade Western Red Cedar with a natural finish. The cedar was installed horizontally, creating a strong visual contrast against the dark gray siding. The installation team meticulously matched the cedar planks to minimize gaps and maintain a clean, consistent look. This design element highlighted the architectural lines of the house and created a focal point on the front facade. The warm tones of the cedar contrasted beautifully with the cool gray, creating a balanced and sophisticated aesthetic. The natural texture of the cedar added a layer of depth and warmth, enhancing the overall appeal of the home.
Problem-Solving During Installation: Dealing with Uneven Walls
This project presented a challenge: the existing walls were significantly uneven, making the installation of new cedar siding more complex. Instead of trying to force the siding onto the uneven surface, which would have led to gaps and an unprofessional look, the installation team took a proactive approach. They carefully measured and mapped the inconsistencies in the walls. They then used shims and furring strips to create a level surface for the new siding. This meticulous approach ensured that the new cedar siding would be installed straight and evenly, preventing potential problems like warping or buckling. The extra time spent preparing the wall surface resulted in a perfectly installed siding that looked seamless and professional. The homeowners were thrilled with the result, appreciating the team’s commitment to quality and attention to detail. The final product showed no evidence of the underlying wall imperfections, demonstrating the effectiveness of careful planning and problem-solving.
Ultimate Conclusion

Source: elitehomeexteriorsnw.com
Replacing your cedar siding is a significant investment, but with careful planning and execution, it can dramatically enhance your home’s curb appeal and longevity. By understanding the costs, material options, installation processes, and maintenance requirements, you can ensure a beautiful and long-lasting result. Remember to factor in all aspects – from initial budgeting to ongoing care – for a truly successful project. Now get ready to transform your home’s exterior!
FAQ Corner: Cedar Siding Replacement
How long does cedar siding typically last?
With proper maintenance, cedar siding can last 20-30 years or even longer.
Can I replace cedar siding myself?
While possible for smaller projects, full replacements are usually best left to professionals due to the complexity and safety concerns.
What’s the best time of year to replace cedar siding?
Spring or fall are generally ideal, avoiding extreme heat or cold for optimal installation and curing.
How often should I clean my cedar siding?
At least once a year, ideally in spring, to remove dirt, debris, and potential mold.
What are the signs I need to replace, not just repair, my cedar siding?
Extensive rot, widespread insect damage, or significant warping often indicate the need for full replacement.
Comments are closed.