Exterior Wood Siding A Complete Guide

Exterior wood siding offers a timeless and classic look for homes, but choosing the right type and installation method is crucial. From the rustic charm of shiplap to the clean lines of board and batten, the options are diverse, each with its own unique aesthetic and maintenance needs. This guide will walk you through everything you need to know, from selecting the perfect siding to ensuring its longevity.
We’ll explore various wood types like cedar, redwood, and pine, comparing their durability, cost, and lifespan. You’ll learn about proper installation techniques, essential tools, and how to maintain your siding to keep it looking its best for years to come. We’ll also delve into the environmental considerations and cost factors involved in choosing exterior wood siding, helping you make an informed decision for your home.
Types of Exterior Wood Siding

Source: henspark.com
Choosing the right wood siding for your home involves understanding the various types available and their unique characteristics. This will help you make an informed decision based on your budget, aesthetic preferences, and the climate where your home is located. We’ll explore common types, compare popular wood species, and discuss maintenance considerations.
Different Types of Wood Siding, Exterior wood siding
Several types of wood siding offer diverse aesthetic and performance qualities. Each has its own distinct look and installation requirements. The choice often comes down to personal preference and budget.
Clapboard: This classic siding style features overlapping horizontal boards, typically 4-8 inches wide and varying in length. The overlapping design helps shed water effectively. The appearance is traditional and timeless, lending a charming look to many homes. Thickness varies, with thicker boards offering better insulation and durability.
Shiplap: Similar to clapboard, shiplap features horizontal boards with a tighter, more uniform overlap. The edges are usually square, creating a clean, modern look. Shiplap often provides a more seamless, less textured appearance than clapboard. Dimensions are similar to clapboard.
Shingle: Wood shingles are individual pieces of wood, typically tapered and often made from cedar or redwood. They are installed in overlapping rows, creating a rustic and textured look. Shingles are available in various sizes and thicknesses, influencing the overall aesthetic and durability.
Board and Batten: This style uses wider vertical boards with narrower strips (battens) covering the seams. The battens add a decorative element and provide extra protection against the elements. Board and batten offers a clean, modern, and often more rustic look compared to clapboard or shiplap.
Comparing Cedar, Redwood, and Pine Siding
Cedar, redwood, and pine are popular choices for exterior wood siding, each possessing unique properties.
Cedar: Known for its natural beauty, resistance to rot and insects, and pleasant aroma. Cedar is a relatively expensive option but offers excellent durability and requires moderate maintenance. It weathers to a silvery-gray patina over time.
Redwood: Similar to cedar in its natural resistance to decay and insects, redwood is also prized for its rich reddish hue. It’s a durable choice, offering a long lifespan with minimal maintenance. Like cedar, it will naturally weather to a gray finish.
Pine: A more affordable option than cedar or redwood, pine requires more maintenance due to its susceptibility to rot and insect damage if not properly treated. It offers a lighter color and is readily available, making it a budget-friendly choice. Pine siding will also weather to a gray finish if left untreated.
Cost, Lifespan, and Maintenance of Wood Siding
The table below summarizes the cost, lifespan, and maintenance requirements of various wood siding options. Keep in mind that costs can vary significantly based on location, wood species, and installation complexity. Lifespan estimates also depend on factors such as climate, maintenance, and proper treatment.
| Type | Cost (per sq ft) | Lifespan (years) | Maintenance |
|---|---|---|---|
| Cedar Clapboard | $6-$12 | 30-50 | Moderate (periodic cleaning, staining/sealing) |
| Redwood Shiplap | $7-$15 | 40-60 | Low (periodic cleaning, occasional staining/sealing) |
| Pine Shingle | $4-$8 | 20-30 | High (regular cleaning, staining/sealing every few years) |
| Pine Board and Batten | $5-$10 | 25-40 | Moderate to High (depending on treatment and climate) |
Installation Methods for Exterior Wood Siding
Source: nichiha.com
Installing wood siding can significantly enhance your home’s curb appeal and protect it from the elements. This process requires careful planning and execution to ensure a long-lasting, aesthetically pleasing result. Success hinges on proper preparation, precise measurements, and the use of appropriate tools and materials.
Tools and Materials Required for Wood Siding Installation
A successful wood siding installation demands the right tools and materials. Having everything on hand before you begin will streamline the process and prevent costly delays. Improper tools can lead to inaccurate cuts and compromised installation quality.
- Measuring Tapes: Essential for accurate measurements of the wall and siding pieces.
- Level: Ensures that each piece of siding is installed plumb and level, preventing a lopsided appearance.
- Circular Saw or Miter Saw: Used for cutting the wood siding to the correct length and angles.
- Hammer: Used to drive nails or staples into the siding.
- Nail Gun (optional but recommended): Significantly speeds up the installation process and provides consistent fastening.
- Safety Glasses and Gloves: Crucial for protecting your eyes and hands from debris and injuries.
- Wood Siding: Choose a high-quality wood siding that is properly treated for weather resistance.
- Sheathing: This is the underlying layer that provides a solid base for the siding.
- Flashing: Used around windows and doors to prevent water damage.
- Caulk: Seals gaps and cracks to prevent water infiltration.
- Nails or Staples: Choose the appropriate fasteners for your siding type and thickness.
Step-by-Step Wood Siding Installation Process
The installation process is methodical, each step building upon the previous one. Skipping steps or rushing the process can lead to significant problems later on.
- Preparation: Begin by ensuring the wall is properly sheathed and any necessary flashing is installed. Clean the surface of the wall to remove any dirt, debris, or loose materials. This provides a clean, stable surface for the siding.
- Measuring and Cutting: Carefully measure the wall sections and cut the wood siding to the appropriate lengths using a circular saw or miter saw. Accurate cutting is crucial for a neat and professional finish. Consider adding a small amount of extra length to account for potential adjustments.
- Installing the First Course: The first course of siding is typically installed at the bottom, establishing a level baseline for the rest of the installation. Use a level to ensure it is perfectly horizontal.
- Installing Subsequent Courses: Each subsequent course of siding is overlapped with the course below it, typically by a set amount specified by the manufacturer’s instructions. Maintain consistent overlap for a uniform look.
- Fastening: Secure each piece of siding using nails or staples, ensuring that the fasteners are driven straight and flush with the surface of the siding. Avoid overdriving nails, which can damage the wood.
- Cutting and Fitting Around Obstacles: Carefully measure and cut the siding to fit around windows, doors, and other obstacles. Use precision to ensure a tight, watertight fit.
- Caulking and Finishing: Once all the siding is installed, caulk any gaps or cracks to prevent water infiltration. This is a crucial step for protecting the underlying structure.
Visual Guide to Cutting, Fitting, and Fastening Wood Siding
Proper techniques are vital for a successful installation. These points illustrate key aspects of precise wood siding application.
- Cutting: Use a sharp blade to ensure clean, accurate cuts. For mitered cuts (angled cuts), use a miter saw for precise angles. Always measure twice before cutting to avoid wasting materials.
- Fitting: Each piece of siding should fit snugly against the previous piece, with consistent overlap. Use shims if necessary to ensure proper alignment and prevent gaps.
- Fastening: Drive nails or staples straight and flush with the surface of the siding. Avoid overdriving, which can cause damage. Space fasteners according to manufacturer’s recommendations. Consider using a nail gun for faster, more consistent results.
Maintenance and Repair of Wood Siding
Keeping your wood siding looking its best and extending its lifespan requires regular maintenance and prompt attention to any problems. Neglecting these tasks can lead to costly repairs down the line, so a proactive approach is key. This section details best practices for cleaning, preserving, and repairing common issues.
Cleaning and Preserving Wood Siding
Regular cleaning is crucial for preventing dirt, mildew, and algae buildup, which can damage the wood and diminish its aesthetic appeal. For routine cleaning, a mixture of mild dish soap and water is usually sufficient. Apply this solution using a soft-bristled brush or a pressure washer (using a low-pressure setting to avoid damaging the wood). Always rinse thoroughly with clean water afterward. For tougher stains, a solution of oxygen bleach and water can be effective, but always test it on a small, inconspicuous area first to ensure it doesn’t damage the finish. After cleaning, consider applying a wood preservative or sealant to protect the wood from the elements and enhance its natural beauty. This should be done according to the manufacturer’s instructions. Remember to let the siding dry completely before applying any sealant.
Rot and Decay in Wood Siding
Rot and decay are significant concerns for wood siding, often caused by prolonged exposure to moisture. Early detection is vital. Look for soft, spongy areas, discoloration, or cracks. If rot is found, the affected area must be removed and replaced with new, appropriately treated wood. Before installing the new wood, ensure the underlying structure is dry and free from further rot. Applying a wood preservative to the surrounding area can help prevent the spread of rot. Proper ventilation around the siding is also crucial to prevent moisture buildup.
Insect Infestation in Wood Siding
Various insects, such as termites and carpenter ants, can damage wood siding. Regular inspections are crucial to detect signs of infestation early. Look for small holes, sawdust-like debris, or unusual sounds. If an infestation is suspected, contact a pest control professional for treatment. They can identify the specific insect and recommend the appropriate course of action, which may involve treatment of the affected areas or even complete replacement of severely damaged sections of siding.
Weathering and Damage to Wood Siding
Weathering is a natural process that affects all exterior wood. Sunlight, rain, and temperature fluctuations can cause fading, cracking, and warping. Regular cleaning and the application of a high-quality wood sealant can help mitigate these effects. If significant damage occurs, such as deep cracks or warping, repair or replacement may be necessary. Consider using wood filler to repair minor cracks and imperfections before repainting or resealing.
Wood Siding Maintenance Schedule
A regular maintenance schedule will help keep your wood siding in top condition and prevent costly repairs. Here’s a suggested schedule:
| Task | Frequency | Materials | Description |
|---|---|---|---|
| Cleaning | Twice yearly (spring and fall) | Mild dish soap, water, soft-bristled brush, garden hose | Clean siding to remove dirt, mildew, and algae. |
| Inspection | Twice yearly (spring and fall) | None | Check for signs of rot, insect infestation, cracks, or damage. |
| Sealant Application | Every 2-3 years | Wood sealant, paintbrush or sprayer | Apply a wood sealant to protect the wood from the elements. |
| Repair | As needed | Wood filler, replacement wood, wood preservative, tools | Repair or replace damaged sections of siding. |
Aesthetic Considerations for Wood Siding

Source: tribblepainting.com
Choosing the right wood siding can dramatically impact your home’s curb appeal, transforming it from ordinary to extraordinary. The interplay of wood type, color, pattern, and finish creates a unique aesthetic that reflects your style and complements your home’s architecture. Careful consideration of these elements will ensure a visually stunning and lasting impression.
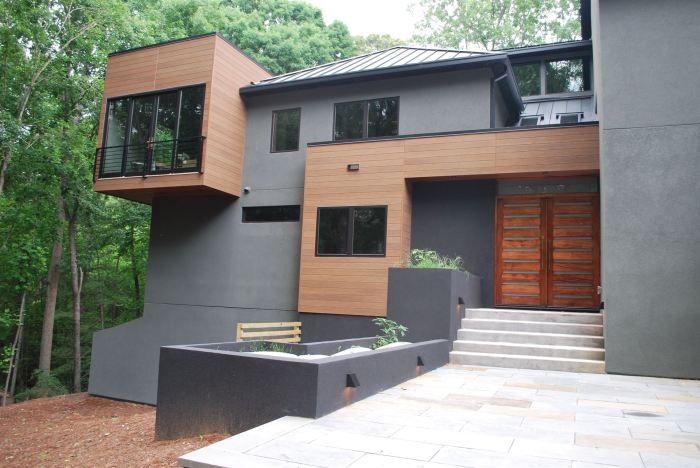
Wood Siding Patterns and Colors Enhance Curb Appeal
Different wood siding patterns and colors offer a wide range of aesthetic possibilities. Vertical siding creates a sense of height and elegance, while horizontal siding provides a more traditional and classic look. The choice of wood species also influences the color and texture, with cedar offering a reddish hue and redwood a rich brown. Painting or staining the siding further expands the color palette, allowing for customization to match personal preferences or the surrounding landscape. For example, a light grey stain on horizontal cedar siding can create a clean, modern look, while a deep, dark brown stain on vertical redwood siding can evoke a rustic, cabin-like feel. A vibrant blue on clapboard siding can add a playful pop of color to a cottage style home, while a muted green blends seamlessly with a natural environment.
Wood Siding Styles Complementing Various Architectural Styles
The style of your home significantly influences the appropriate choice of wood siding. Consider these examples:
- Victorian: Victorian homes often feature intricate details and ornate designs. Vertical board and batten siding, perhaps with decorative trim, would complement this style, creating a sense of verticality and elegance. A darker stain or paint color would enhance the richness of the details. Imagine deep greens, dark browns, or even a dramatic black creating a striking contrast against lighter trim.
- Ranch: Ranch homes often emphasize horizontal lines and a low profile. Horizontal shiplap siding, known for its clean lines and simple aesthetic, is an ideal choice. A lighter stain or paint color, such as a warm beige or grey, would create a feeling of openness and enhance the horizontal lines. A muted grey-blue could even create a coastal aesthetic.
- Craftsman: Craftsman homes are characterized by their handcrafted details and natural materials. Beveled siding, with its slightly angled edges, creates a visually interesting texture that complements the craftsmanship of the home. Natural wood stains that showcase the wood grain would enhance the natural aesthetic. Think warm honey tones or deep reddish browns, highlighting the craftsmanship.
Incorporating Different Textures and Finishes for Visual Interest
Texture and finish are crucial elements in creating visual interest with wood siding. The natural texture of the wood itself can provide a significant amount of visual appeal. However, adding different textures and finishes can elevate the design even further. For example, combining smooth, painted siding with rough-hewn, stained siding can create a dynamic contrast. A variety of wood species with differing grain patterns also adds visual complexity. Consider using a smooth, painted finish on the main body of the house and a more textured, stained finish on accents such as dormers or gables. The interplay of textures can create a sense of depth and visual interest. Similarly, combining a matte finish with a semi-gloss finish can add another layer of visual complexity.
Environmental Impact and Sustainability
Choosing exterior wood siding involves considering its environmental footprint, from the harvesting of trees to the eventual disposal or repurposing of the material. Sustainable practices and material choices can significantly lessen the impact on the environment.
Sustainable forestry practices are crucial to minimizing the environmental impact of wood siding. This includes responsible logging methods that prioritize reforestation, protect biodiversity, and avoid deforestation of old-growth forests. Certifications like the Forest Stewardship Council (FSC) label can help consumers identify wood products sourced from responsibly managed forests. Using wood from sustainably managed forests ensures a renewable resource is utilized without depleting natural habitats or contributing to climate change.
Sustainable Forestry Practices
Sustainable forestry goes beyond simply cutting down trees; it’s about managing forests for long-term health and productivity. Key aspects include selective logging, which targets specific trees while leaving the forest structure largely intact; reforestation efforts, ensuring new trees are planted to replace those harvested; and the protection of sensitive ecosystems within the forest. These practices help to maintain biodiversity, prevent soil erosion, and reduce carbon emissions. Proper forest management also reduces the risk of wildfires and pest infestations, contributing to the overall health of the forest ecosystem.
Reclaimed and Recycled Wood Siding
Using reclaimed or recycled wood for exterior siding offers significant environmental benefits. Reclaimed wood, salvaged from old buildings or structures, avoids the need for new timber harvesting, reducing pressure on forests. This also preserves the unique character of the wood, often resulting in a beautiful, rustic finish. Recycled wood, while less common for siding, can be created from wood waste, further minimizing the environmental impact. However, reclaimed wood may require more extensive preparation and treatment to ensure durability and pest resistance, potentially increasing costs. Furthermore, the availability of reclaimed wood can be limited, depending on location and the type of wood sought.
Environmental Footprint Comparison
The environmental impact of wood siding compared to other materials is complex and depends on various factors, including sourcing, manufacturing processes, and transportation. The following table provides a simplified comparison:
| Material | Environmental Impact | Cost | Lifespan |
|---|---|---|---|
| Wood (Sustainably Sourced) | Relatively low impact with proper forest management; biodegradable. | Moderate to High | 30-50+ years |
| Vinyl | High manufacturing energy consumption; non-biodegradable; contains PVC. | Low to Moderate | 20-30 years |
| Fiber Cement | Moderate impact due to cement production; contains asbestos in some older products. | Moderate to High | 50+ years |
Note: Costs and lifespans are estimates and can vary based on product quality, installation, and maintenance. Environmental impact assessments are also complex and subject to differing methodologies.
Cost Considerations and Budgeting
Planning a wood siding project requires careful consideration of the associated costs. The total expense will depend on several interconnected factors, impacting your overall budget. Understanding these factors is crucial for accurate planning and avoiding unexpected financial burdens.
Factors Influencing Wood Siding Costs
Several key elements contribute to the final cost of your wood siding installation. These include the type and quality of the wood siding itself, the amount of labor needed for installation, the necessary permits and inspections, and any additional complexities specific to your home’s structure. Material costs can vary widely depending on wood type (e.g., cedar, redwood, pine), grade, and finish. Labor costs are influenced by the project’s size, complexity (e.g., intricate detailing, extensive repairs), and the contractor’s hourly rate or project fee. Permitting fees differ based on local regulations and the scope of the work.
Material Costs
The cost of wood siding varies significantly depending on the type of wood, its grade, and the region. High-quality, durable woods like cedar and redwood command higher prices than less expensive options like pine or fir. The grade of the wood also affects the cost; higher grades with fewer imperfections are more expensive. For example, a premium grade cedar siding might cost $8-$15 per square foot, while a lower-grade pine siding could cost $4-$8 per square foot. These are estimates and can fluctuate based on market conditions and supplier pricing. Additional costs might include underlayment, flashing, and fasteners.
Labor Costs
Labor costs constitute a substantial portion of the overall project expense. The hourly rate of experienced siding installers can range from $50 to $100 or more, depending on location and demand. The total labor cost depends on the size of the house, the complexity of the installation (e.g., difficult angles, extensive trim work), and the number of installers needed. A simple project on a small house might cost a few thousand dollars in labor, while a complex project on a large house could cost tens of thousands.
Permitting and Inspection Fees
Obtaining necessary permits and undergoing inspections adds to the overall project cost. Permitting fees vary widely based on location and the project’s scope. Some areas have higher fees than others, and larger projects naturally incur higher costs. Inspection fees are also added to cover the cost of ensuring the work meets local building codes. It’s essential to factor these costs into your budget early in the planning process.
Sample Cost Breakdowns
To illustrate cost variations, consider these examples:
| Project | House Size (sq ft) | Material Cost | Labor Cost | Permitting/Inspection | Total Estimated Cost |
|---|---|---|---|---|---|
| Small House, Simple Siding | 1,000 | $4,000 | $3,000 | $500 | $7,500 |
| Medium House, Moderate Complexity | 1,800 | $10,000 | $8,000 | $1,000 | $19,000 |
| Large House, Complex Design | 3,000 | $20,000 | $15,000 | $2,000 | $37,000 |
Note: These are estimates and actual costs may vary based on specific circumstances.
Sample Budget Template
| Expense Category | Estimated Cost | Actual Cost |
|---|---|---|
| Material Costs (Siding, Underlayment, Fasteners, etc.) | ||
| Labor Costs (Installation, Cleanup) | ||
| Permitting and Inspection Fees | ||
| Contingency Fund (10-20% of total estimated cost) | ||
| Total Project Cost |
Remember to obtain multiple quotes from different contractors to compare prices and ensure you are getting a fair price for your project. A detailed budget will help you stay on track financially and prevent cost overruns.
Conclusive Thoughts
Ultimately, choosing exterior wood siding is a significant decision impacting your home’s aesthetic appeal, longevity, and environmental footprint. By understanding the different types of wood siding, installation methods, maintenance requirements, and cost considerations, you can confidently select the perfect option to enhance your home’s curb appeal and increase its value. Remember, proper planning and maintenance are key to maximizing the lifespan and beauty of your wood siding investment.
Question & Answer Hub
How often should I stain or seal my wood siding?
The frequency depends on the type of wood and climate, but generally, every 3-5 years is recommended. Check your manufacturer’s instructions for specifics.
Can I install wood siding myself?
While possible for DIYers with experience, professional installation is often recommended for a flawless finish and to avoid costly mistakes.
What’s the best way to clean wood siding?
Use a soft brush and a mixture of mild detergent and water. Avoid high-pressure washers which can damage the wood.
What are the signs of wood rot?
Look for soft, spongy areas, discoloration, or crumbling wood. Address these issues promptly to prevent further damage.
How do I prevent insect infestations?
Regular inspection, proper sealing, and using insect repellent treatments can help deter pests.
Comments are closed.