Wood Siding Contractors Your Guide
Wood siding contractors are essential for anyone looking to enhance their home’s curb appeal and value with the natural beauty and durability of wood siding. This guide walks you through the entire process, from choosing the right wood type and finding a reputable contractor to understanding installation, maintenance, and potential costs. We’ll cover everything you need to know to make informed decisions and ensure a successful project.
Selecting the perfect wood siding—whether cedar, redwood, or pine—is just the beginning. This guide dives into the specifics of each material, comparing their durability, cost, and maintenance needs. We’ll also address the environmental impact of your choices, helping you make a sustainable selection. Finding a reliable contractor is equally crucial; we’ll provide a checklist to help you vet potential candidates, ensuring they’re licensed, insured, and have a proven track record. From the initial planning stages to the final finishing touches, we’ll break down the installation process step-by-step, empowering you to oversee your project effectively. Finally, we’ll cover maintenance, repairs, cost considerations, and legal aspects to provide a comprehensive understanding of your wood siding journey.
Understanding Wood Siding Materials: Wood Siding Contractors
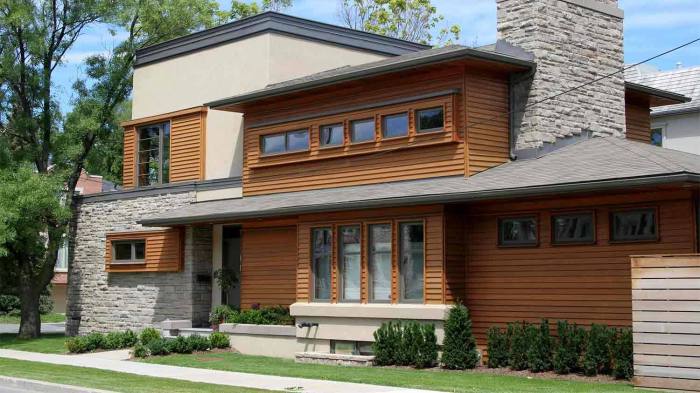
Source: empirewindowcompany.com
Choosing the right wood siding for your home is a crucial decision impacting aesthetics, durability, and long-term cost. This section will delve into the properties of popular wood siding options, helping you make an informed choice. We’ll compare different types of wood, considering their lifespan, maintenance needs, and environmental impact.
Wood Siding Material Comparison: Cedar, Redwood, and Pine
Cedar, redwood, and pine are among the most commonly used woods for siding. Each offers unique characteristics influencing its suitability for different climates and budgets. Cedar, known for its beautiful grain and natural resistance to rot and insects, is a premium choice, but comes with a higher price tag. Redwood, similarly resistant to decay, offers a rich reddish hue and excellent durability. Pine, a more affordable option, requires more frequent maintenance due to its lower natural resistance to the elements. The differences in cost reflect not only the inherent properties of the wood but also the availability and processing involved.
Wood Siding Lifespan and Maintenance
The longevity and maintenance requirements of wood siding vary significantly depending on the type of wood, the quality of installation, and the climate. Regular cleaning and occasional repainting or staining are essential to prolong the life of any wood siding. Exposure to harsh weather conditions, especially moisture, can accelerate deterioration. Proper installation, including adequate ventilation and weatherproofing, is crucial in minimizing maintenance needs and extending lifespan.
| Material | Lifespan (Years) | Maintenance Frequency | Cost (Relative) |
|---|---|---|---|
| Cedar | 30-50+ | Every 5-10 years | High |
| Redwood | 30-50+ | Every 5-10 years | High-Medium |
| Pine | 15-30 | Every 3-5 years | Low-Medium |
Environmental Impact of Wood Siding Choices
The environmental impact of wood siding is multifaceted, encompassing the sourcing of the wood, its processing, and its eventual disposal. Sustainable sourcing practices, such as utilizing wood from responsibly managed forests certified by organizations like the Forest Stewardship Council (FSC), are crucial for minimizing the environmental footprint. Choosing locally sourced wood reduces transportation emissions, further contributing to a smaller carbon footprint. Consider the entire lifecycle of the wood siding, from forest to final disposal, when making your selection. While wood is a renewable resource, responsible forestry and efficient manufacturing are essential for ensuring its long-term sustainability.
Finding and Vetting Wood Siding Contractors
Choosing the right contractor is crucial for a successful wood siding project. A poorly chosen contractor can lead to cost overruns, shoddy workmanship, and significant headaches. This section will guide you through the process of finding and vetting potential contractors to ensure a smooth and satisfying experience.
Contractor Evaluation Checklist
A comprehensive checklist helps you objectively compare different contractors. Using a standardized checklist ensures you don’t overlook critical aspects during your evaluation. Remember, this is a tool to help you make an informed decision, not a guarantee of perfect results.
- Experience: How many years of experience do they have with wood siding installation specifically? Look for contractors with a proven track record of successful projects.
- References: Request at least three references and contact them to inquire about the contractor’s work quality, communication, and adherence to timelines. Ask specific questions about their experience.
- Licensing and Insurance: Verify that the contractor holds all necessary licenses and carries adequate liability and workers’ compensation insurance. This protects you from potential financial liabilities in case of accidents or disputes.
- Warranty: What kind of warranty do they offer on their workmanship and materials? A solid warranty demonstrates confidence in their work.
- Detailed Proposal: Ensure the proposal is comprehensive, outlining all aspects of the project, including materials, labor costs, and a clear payment schedule.
- Communication: How responsive are they to your questions and concerns? Good communication is essential for a successful project.
- Cleanliness and Professionalism: Inquire about their cleanup procedures during and after the project. A professional contractor maintains a clean and organized worksite.
Obtaining and Comparing Multiple Quotes
Getting multiple quotes is essential for comparing prices and services. Avoid selecting a contractor based solely on price; consider the overall value they offer, including experience, reputation, and warranty.
When requesting quotes, ensure all contractors are bidding on the same scope of work. Provide detailed specifications, including materials, design plans, and any special requirements. This prevents discrepancies in pricing due to differing interpretations of the project.
Compare quotes based on factors beyond just the total cost. Analyze the breakdown of labor and materials, warranty details, payment schedules, and projected timelines. Consider the overall value proposition each contractor offers, not just the lowest price.
Verifying Contractor Credentials
Verifying licenses, insurance, and references is a crucial step in protecting yourself. Don’t hesitate to make these checks; it’s a vital part of due diligence.
Contact your state’s licensing board to verify the contractor’s license status and ensure it’s current and valid. Request proof of insurance from the contractor, including liability and workers’ compensation coverage. Thoroughly check references by contacting previous clients and asking detailed questions about their experience with the contractor.
Failing to verify these credentials can lead to significant problems, including legal issues, financial losses, and subpar workmanship. Always prioritize thorough vetting to safeguard your investment and ensure a successful project.
The Wood Siding Installation Process
Installing wood siding is a multifaceted process requiring precision and expertise. A successful installation depends on careful preparation, proper material selection (as discussed previously), and meticulous execution of each step. This section details the typical stages involved, common installation methods, and guidance for clients to effectively oversee the project.
The entire process, from initial site preparation to final cleanup, typically involves several key stages. These stages are interconnected, and a problem in one area can significantly impact the others. Careful planning and communication with your contractor are essential for a smooth and successful installation.
Site Preparation and Wall Sheathing
Before any siding goes up, the existing wall surface needs thorough preparation. This includes removing old siding, repairing any damaged sheathing or framing, and ensuring the wall is structurally sound. Proper sheathing, typically oriented strand board (OSB) or plywood, provides a stable base for the siding. Any imperfections or inconsistencies in the sheathing will be reflected in the finished siding. The sheathing should be properly fastened and sealed to prevent moisture intrusion. A properly prepared surface will significantly improve the longevity and appearance of your new wood siding.
Installation Methods
Several common methods exist for installing wood siding, each with its advantages and disadvantages.
Choosing the right method depends on factors such as the type of siding, the building’s design, and your budget. Careful consideration of these factors is crucial for achieving the desired aesthetic and ensuring the longevity of the siding.
- Lap Siding: This classic method involves overlapping horizontal boards, creating a visually appealing and weather-resistant barrier. Advantages include its relative simplicity and cost-effectiveness. Disadvantages include the potential for water penetration if not installed correctly and the need for careful planning to minimize waste.
- Shiplap Siding: Similar to lap siding, but the boards interlock more tightly, creating a stronger and more water-resistant seal. Advantages include improved weather protection and a cleaner, more modern look. Disadvantages include a slightly higher cost and potentially more complex installation.
- Bevel Siding: This type of siding features boards with a beveled edge, creating a distinctive shadow line. Advantages include its aesthetic appeal and relatively easy installation. Disadvantages include potential for water penetration if not installed properly and slightly less weather resistance than shiplap.
Step-by-Step Client Oversight Guide, Wood siding contractors
Effectively overseeing your wood siding installation involves active participation and clear communication with your contractor. Here’s a step-by-step guide:
- Pre-Installation Meeting: Review the contract, plans, and materials with the contractor. Confirm the schedule and payment terms.
- Site Preparation Inspection: Check that the existing wall is properly prepared, and sheathing is correctly installed and secured.
- Material Inspection: Inspect the delivered wood siding for any damage or defects. Ensure the quantity matches the contract.
- Ongoing Progress Checks: Regularly check the installation progress, paying attention to details like proper flashing, caulking, and nailing.
- Quality Control: Verify that the siding is installed according to the plans and specifications, with consistent spacing and alignment.
- Final Inspection: Conduct a thorough final inspection before final payment, checking for any imperfections or unfinished work.
Finishing Touches and Cleanup
Once the siding is installed, finishing touches are crucial. This includes caulking around windows and doors, installing trim and molding, and applying a protective sealant or stain. Proper cleanup of the worksite should also be completed by the contractor. A well-maintained and finished installation significantly extends the life of the wood siding and enhances its aesthetic appeal. The final product should reflect the quality of materials and the skill of the installation.
Maintenance and Repair of Wood Siding
Keeping your wood siding looking great and lasting for years requires regular maintenance. Neglecting this can lead to costly repairs down the line, so a little preventative care goes a long way. Think of it like regular car maintenance – small efforts now prevent bigger problems later.
Regular cleaning and maintenance significantly extend the lifespan of your wood siding, preventing damage from weather, insects, and rot. This proactive approach saves you money in the long run by avoiding expensive repairs or premature replacement. Proper cleaning removes dirt, mildew, and other debris that can trap moisture and accelerate deterioration. Sealing protects the wood from the elements, preventing water damage and prolonging its natural beauty.
Identifying and Addressing Common Wood Siding Problems
Wood siding, while beautiful, is susceptible to several issues. Prompt identification and treatment are crucial to prevent minor problems from escalating into major, costly repairs. Common problems include rot, insect infestation, and water damage. Each requires a different approach to repair.
Cleaning and Sealing Wood Siding
Proper cleaning and sealing are essential steps in maintaining your wood siding. A thorough cleaning removes dirt, mildew, and other contaminants, preparing the surface for sealing. Sealing creates a protective barrier against moisture and UV damage, preserving the wood’s integrity and appearance.
A visual guide to cleaning and sealing wood siding:
Imagine a section of your wood siding, perhaps 8 feet by 4 feet.
Step 1: Preparation. First, you’d use a soft-bristled brush or a pressure washer (low pressure setting) to gently remove loose dirt, cobwebs, and any visible mildew. For stubborn mildew, a solution of mild detergent and water can be applied and left to sit for a few minutes before scrubbing. Rinse thoroughly with clean water. Allow the siding to completely dry before proceeding.
Step 2: Sealing. Once dry, apply a high-quality wood sealant using a brush or roller. Work in small sections, ensuring even coverage and avoiding drips or runs. Follow the manufacturer’s instructions for drying time and reapplication if necessary. Pay close attention to seams and joints where moisture can penetrate. A second coat is often recommended for optimal protection.
Step 3: Inspection. After the sealant has fully dried, inspect the siding carefully for any remaining areas that need attention. Address any lingering issues promptly to prevent further damage. This meticulous approach ensures your wood siding remains protected and beautiful for years to come. Remember to wear appropriate safety gear, such as gloves and eye protection, during the entire process.
Cost Considerations for Wood Siding Projects
Source: buffalo-lumber.com
Choosing wood siding for your home is a significant investment, and understanding the cost factors involved is crucial for successful budgeting and project planning. The total cost will depend on several interconnected variables, including the type of wood, the size of your house, and the labor required for installation. Failing to account for all these factors can lead to unexpected expenses and project delays.
The overall cost of a wood siding project is a complex calculation. It’s not simply the price of the wood itself; several other factors heavily influence the final bill. These include the type and quality of wood chosen, the square footage of the area to be sided, the complexity of the project (e.g., intricate trim work), and the prevailing labor rates in your region. Permitting fees and the cost of any necessary repairs or replacements to underlying structures also need to be considered.
Material Choice and Pricing
Different wood types have vastly different price points. Cedar, for instance, is a popular choice due to its durability and aesthetic appeal, but it’s generally more expensive than pine or redwood. The grade of the wood also impacts cost; higher grades, with fewer knots and imperfections, command higher prices. Furthermore, the thickness of the siding planks plays a role; thicker planks are more durable but cost more. For example, a premium grade, thick cedar siding will be significantly pricier than a standard grade, thinner pine option. Pre-finished siding, while convenient, often adds to the initial expense.
Project Size and Labor Costs
The square footage of your home’s exterior directly impacts material costs. A larger house will naturally require more siding, increasing the overall expense. Labor costs are also significantly influenced by project size; more square footage means more hours of labor, resulting in a higher labor bill. The complexity of the project also affects labor costs. A house with intricate architectural details or numerous corners and angles will require more time and skill, leading to higher labor charges. For instance, a simple ranch-style home will generally be less expensive to build than a Victorian-style home with numerous gables and decorative trim.
Budgeting Strategies for Wood Siding Projects
Planning a realistic budget is essential for a smooth project. Consider these strategies:
- Contingency Fund: Always include a contingency fund (typically 10-20% of the total estimated cost) to cover unexpected expenses like material damage, unforeseen repairs, or price fluctuations.
- Phased Approach: If budget is a major constraint, consider a phased approach, siding one section of the house at a time. This allows you to spread the cost over a longer period.
- Explore Financing Options: Home improvement loans or lines of credit can help manage larger projects, allowing you to pay over time.
- Shop Around for Materials and Labor: Obtain multiple quotes from different suppliers and contractors to compare pricing and services.
Cost Savings Through Maintenance and Preventative Care
Proper maintenance significantly reduces long-term costs. Regular cleaning, staining, and sealing protect the wood from the elements, preventing damage and extending its lifespan. Addressing minor issues promptly, such as replacing damaged planks, prevents larger, more expensive repairs down the line. For example, a timely coat of sealant can prevent water damage that could otherwise lead to costly repairs or even siding replacement. Investing in preventative maintenance is a cost-effective way to protect your investment and avoid substantial future expenses.
Legal and Warranty Aspects
Choosing a wood siding contractor involves more than just picking a pretty design; it’s a significant investment requiring a solid understanding of the legal and warranty aspects to protect yourself. A well-defined contract and knowledge of your rights are crucial for a smooth and satisfactory project.
This section addresses key legal considerations for wood siding contracts, focusing on warranties and liability, the importance of detailed written contracts, and the process for resolving disputes or warranty claims. Ignoring these aspects can lead to costly and frustrating delays or even legal battles.
Contractual Agreements
A comprehensive written contract is your primary defense against potential problems. This document should detail all aspects of the project, including the scope of work (materials, labor, and specific tasks), payment schedule, project timeline with start and completion dates, and the contractor’s warranties. Ambiguity leaves room for disputes. For instance, a contract vaguely describing the type of wood used could lead to disagreements if the final product doesn’t meet your expectations. The contract should specify the exact species, grade, and treatment of the wood. Similarly, the payment schedule should be articulated, avoiding disputes over payment milestones. Include specific clauses about change orders and how they’ll be handled, addressing any potential cost or timeline adjustments.
Warranties and Liability
Most reputable contractors offer warranties on their workmanship and sometimes on materials. These warranties typically cover defects in materials or installation for a specified period. Understanding the terms of the warranty is vital. Does it cover labor only, materials only, or both? What is the duration of the warranty? What constitutes a valid warranty claim? The contract should clearly state the warranty terms, including limitations and exclusions. Liability is another critical aspect. The contract should clarify who is responsible for damages during the installation process, such as accidental damage to your property. For example, a clause might state that the contractor is responsible for repairing any damage caused by their work crew. Furthermore, the contract should specify how liability is handled in case of unforeseen circumstances, such as weather-related delays.
Dispute Resolution
Disputes can arise even with the best-laid plans. Your contract should have an article on a process for resolving disagreements. This might involve mediation or arbitration, avoiding costly and time-consuming litigation. For instance, the contract could specify that any disputes will be resolved through binding arbitration by the rules of a specific arbitration organization. Before engaging in legal action, attempt to resolve the issue directly with the contractor. Document all communication, including emails, letters, and phone calls. If the contractor fails to address your concerns, you may need to pursue other avenues for resolution, such as contacting your state’s contractor licensing board or filing a claim in small claims court. Keeping detailed records of the project, including dates, communications, and payments, will be crucial if a dispute arises.
Final Summary
Source: angi.com
Choosing wood siding is a significant investment, impacting both your home’s aesthetic and its long-term value. By understanding the various wood types, meticulously selecting a contractor, and following proper installation and maintenance practices, you can ensure a beautiful, durable, and long-lasting result. Remember, thorough planning and proactive care will protect your investment and minimize potential problems down the line. This guide equipped you with the knowledge to navigate the entire process with confidence, turning your vision of a stunning wood-sided home into a reality.
Popular Questions
What is the average lifespan of wood siding?
The lifespan varies greatly depending on the wood type, climate, and maintenance. Expect anywhere from 20 to 50 years or more with proper care.
How much does wood siding installation typically cost?
Costs vary significantly based on the size of your home, the type of wood, and labor rates in your area. Get multiple quotes to compare pricing.
Can I install wood siding myself?
While possible for smaller projects, professional installation is generally recommended for larger projects to ensure proper installation and a long-lasting result. Improper installation can lead to costly repairs later.
What kind of warranty should I expect from a contractor?
Look for a warranty that covers both materials and workmanship. The length of the warranty should be clearly stated in the contract.
How often should I clean my wood siding?
Cleaning frequency depends on your climate and environment, but at least once a year is recommended, especially in areas with heavy pollen or grime.
Comments are closed.