Wood Siding Repair and Painting Guide
Wood siding repair and painting: It sounds like a chore, right? But with the right know-how, transforming your weathered siding into a beautiful, protected exterior is achievable. This guide breaks down the entire process, from identifying damage and choosing the right materials to painting like a pro. We’ll cover everything from common wood types and their quirks to tackling tricky repairs and ensuring a long-lasting finish. Get ready to breathe new life into your home’s exterior!
We’ll walk you through assessing the condition of your siding, identifying problems like rot, cracks, or insect damage. Learn the proper techniques for repairing these issues, including replacing rotten boards and patching cracks. Then, we’ll dive into prepping your siding for paint—cleaning, scraping, caulking, and priming are all crucial steps for a flawless finish. Finally, we’ll explore paint choices, application techniques, and essential safety precautions to ensure a professional-looking and long-lasting result.
Types of Wood Siding

Source: paintingdenver.net
Choosing the right wood siding for your home is a crucial decision impacting both its aesthetics and longevity. Different wood types offer varying levels of durability, maintenance requirements, and visual appeal. Understanding these differences is key to making an informed choice and ensuring a successful repair and painting project.
Several common wood species are used for residential siding, each possessing unique properties. These differences directly influence the repair and painting process, from the ease of working with the wood to its susceptibility to damage and the type of paint best suited for it.
Common Wood Siding Materials and Their Properties
Let’s explore the characteristics of some popular wood siding options. This comparison will highlight their strengths and weaknesses, helping you determine the best fit for your home’s needs and your project’s scope.
| Material | Durability | Maintenance | Aesthetics |
|---|---|---|---|
| Cedar | High; naturally resistant to rot and insects. Expect a lifespan of 20-30 years or more with proper maintenance. | Moderate; requires periodic cleaning and occasional staining or sealing to protect against the elements. | Varied; offers a rich, reddish-brown hue that weathers to a silvery gray. Provides a classic, natural look. |
| Redwood | High; similar to cedar in its natural resistance to decay and insect damage. Also boasts a long lifespan of 20-30 years or more. | Moderate; similar maintenance needs to cedar, requiring occasional cleaning and protective treatments. | Rich, reddish-brown color that deepens over time. Often chosen for its warmth and natural beauty. |
| Pine | Moderate; less naturally resistant to rot and insects than cedar or redwood. Lifespan can range from 15-25 years depending on climate and treatment. | Higher; requires more frequent maintenance, including regular staining or sealing to prevent decay and insect infestation. | Light, yellowish-brown color; versatile and can be easily stained or painted to achieve various looks. |
Impact of Wood Type on Repair and Painting, Wood siding repair and painting
The type of wood significantly influences the repair and painting process. For example, the denser grain of cedar and redwood may require more effort to prepare for painting, but they’ll also provide a more durable and longer-lasting finish. Pine, being softer, might require more careful handling during repairs to avoid damage, and its porous nature may necessitate more coats of paint for adequate coverage.
Cedar and redwood’s natural resistance to rot and insects means fewer repairs are generally needed. However, if repairs are necessary, the density of the wood can make it slightly more challenging to work with. Pine, being more susceptible to damage, might require more frequent repairs. The softer wood is easier to work with during repairs, but it also requires more careful handling to prevent further damage.
The choice of paint also depends on the wood type. Oil-based paints are often preferred for their durability on denser woods like cedar and redwood, while water-based paints might be suitable for pine. However, the best choice always depends on the specific conditions and desired aesthetic outcome. Always follow the manufacturer’s recommendations for the paint and primer.
Assessing Damage to Wood Siding

Source: surepropainting.com
Assessing the condition of your wood siding is crucial before undertaking any repairs or painting. A thorough inspection will help you determine the extent of the damage and plan the necessary work. Ignoring even minor issues can lead to more extensive and costly problems down the line. This section will guide you through identifying common types of damage and performing a systematic inspection.
Types of Wood Siding Damage
Various factors can damage wood siding, leading to aesthetic issues and structural problems. Understanding these types of damage will help you effectively assess and address them.
- Rot: Caused by prolonged exposure to moisture, rot weakens the wood, making it spongy and crumbly. This is often accompanied by a discoloration, typically a dark brown or black. Rot can be superficial or penetrate deep into the siding.
- Cracks: These can range from hairline fractures to large splits. Cracks can result from shrinking and swelling due to changes in moisture content, or from physical impact. They weaken the structural integrity of the siding and allow water penetration.
- Insect Infestation: Termites, carpenter ants, and wood-boring beetles can cause significant damage. Signs include small holes, sawdust-like frass (insect excrement), and tunnels within the wood. Infestation can weaken the wood and compromise its structural integrity.
- Water Damage: Beyond rot, water can cause swelling, warping, and discoloration. Persistent moisture can lead to mold and mildew growth, further degrading the siding. Water damage often manifests as stains or streaks on the wood’s surface.
- Peeling Paint: While not direct damage to the wood itself, peeling paint exposes the underlying wood to the elements, accelerating deterioration. It indicates a need for surface preparation before repainting.
Inspecting Wood Siding for Damage
A systematic approach to inspection is key to identifying all damage. Here’s a step-by-step procedure:
- Gather your tools: You’ll need a ladder (if necessary), a putty knife or screwdriver (for probing suspect areas), a flashlight (to inspect crevices), and safety glasses.
- Visual inspection: Begin by visually inspecting the entire siding from the ground and, if necessary, from a ladder. Look for any obvious signs of damage, such as cracks, rot, holes, discoloration, or peeling paint.
- Close examination: Carefully examine each section of siding. Pay close attention to areas prone to moisture accumulation, such as corners, joints, and areas near the ground. Use your flashlight to illuminate crevices and inspect for hidden damage.
- Probing: Use a putty knife or screwdriver to gently probe any suspicious areas. If the wood feels soft or crumbly, it’s likely rotten. Pay attention to the depth of the damage.
- Document findings: Take notes or photos of all damaged areas, noting the type and extent of the damage. This will be invaluable when planning repairs.
Wood Siding Damage Assessment Checklist
| Area | Type of Damage | Extent of Damage (Minor, Moderate, Severe) | Notes |
|---|---|---|---|
| North Side | |||
| East Side | |||
| South Side | |||
| West Side | |||
| Corners | |||
| Around Windows/Doors | |||
| Ground Level |
Repairing Damaged Wood Siding
Source: angi.com
Repairing damaged wood siding can significantly extend the life of your home’s exterior and maintain its curb appeal. Successful repairs depend on properly assessing the damage, selecting the right materials, and employing the correct techniques. This section details common repair methods and best practices for preparing and installing new siding.
Replacing Rotten Boards
Rotten wood siding needs to be completely removed and replaced. This is crucial to prevent further rot and structural damage. Begin by carefully removing the damaged board using a pry bar, working gently to avoid damaging surrounding boards. If nails are difficult to remove, use a nail puller or hammer to carefully extract them. Once removed, inspect the area for any underlying damage to the sheathing. If the sheathing is also compromised, it will need to be replaced before installing the new siding. The new board should be the same type and thickness as the existing siding. Pre-drill pilot holes before nailing the new board in place to prevent splitting. Use exterior-grade nails and countersink them slightly below the surface of the wood. Finally, caulk any gaps between the new board and surrounding boards to ensure a watertight seal.
Patching Cracks
Small cracks in wood siding can often be repaired with wood filler. First, clean the crack thoroughly to remove any dirt or debris. Then, apply a suitable exterior-grade wood filler, pressing it firmly into the crack to ensure complete filling. Once the filler is dry, sand it smooth using fine-grit sandpaper. For larger cracks, consider using wood patching compound which provides more structural support. Apply the compound, let it dry, sand it smooth, and then prime and paint the patched area to match the existing siding. This will help to blend the repair seamlessly with the rest of the siding.
Preparing the Wood Surface for Repair
Proper surface preparation is vital for successful repairs and a long-lasting paint job. Start by thoroughly cleaning the area to be repaired. Use a stiff brush or pressure washer to remove dirt, loose paint, mildew, and other contaminants. Allow the wood to dry completely before proceeding. Next, sand the area to create a smooth surface for better adhesion of the filler or new siding. Use fine-grit sandpaper and sand gently to avoid damaging the surrounding wood. Once sanded, wipe away any dust with a clean cloth. Finally, apply a high-quality exterior-grade primer to the repaired area. This will help to seal the wood, prevent moisture absorption, and provide a better surface for the final coat of paint.
Installing New Siding Boards
Installing new siding boards requires careful attention to detail to ensure a seamless transition with existing siding. Begin by measuring and cutting the new board to the correct length. Pre-drill pilot holes before nailing the new board in place. Use exterior-grade nails and countersink them slightly below the surface of the wood. Space the nails evenly to prevent warping or buckling. Make sure the new board is flush with the surrounding boards. Caulk any gaps between the new board and adjacent boards to create a watertight seal. After installation, prime and paint the new board to match the existing siding. This will ensure a consistent and aesthetically pleasing finish.
Preparing Wood Siding for Painting
Proper preparation is the key to a long-lasting and beautiful paint job on your wood siding. Taking the time to thoroughly clean, scrape, caulk, and prime the surface will prevent peeling, chipping, and other issues down the road, saving you time and money in the long run. A well-prepared surface allows the paint to adhere properly, maximizing its lifespan and enhancing the overall aesthetic appeal of your home.
A neglected surface will lead to paint failure. Think of it like trying to paint a dusty, rusty car without cleaning it first – the paint won’t stick, and the result will look terrible. Similarly, preparing your wood siding is crucial for a professional-looking finish that will last for years.
Cleaning the Wood Siding
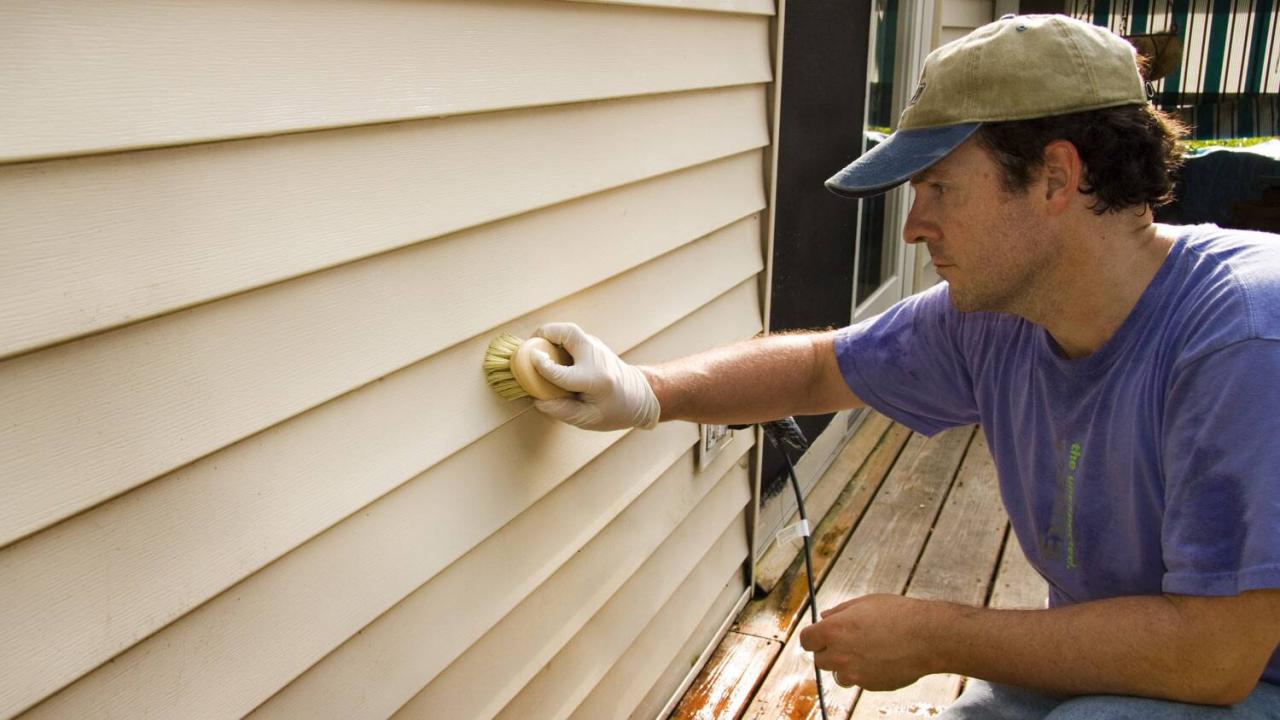
Thorough cleaning removes dirt, mildew, loose paint, and other debris that can interfere with paint adhesion. Start by using a pressure washer set to a low pressure setting to avoid damaging the wood. Follow this with a scrub using a stiff-bristled brush and a solution of mild detergent and water. For stubborn mildew, a solution of bleach and water (follow product instructions carefully) can be effective, but always wear protective gear like gloves and eye protection. Allow the siding to dry completely before proceeding to the next step. Remember to rinse thoroughly after cleaning with detergent or bleach solution to prevent residue from interfering with the paint.
Scraping and Caulking Wood Siding
Scraping removes loose paint, allowing the new paint to adhere properly. Imagine a painter’s scraper, a long, flat metal blade with a comfortable handle. You would hold the scraper at a low angle, gently applying pressure to lift and remove peeling or flaking paint. Focus on areas with significant damage, working systematically from top to bottom. For larger areas of loose paint, a heat gun can soften the paint, making scraping easier. Always wear safety glasses to protect your eyes from flying paint chips. After scraping, inspect the surface for any gaps or cracks between siding boards.
Caulking fills these gaps, preventing water intrusion and improving the overall look of the siding. Visualize a caulking gun dispensing a bead of caulk into the cracks. Use a caulking tool to smooth the caulk into a neat, even line. Choose a high-quality exterior-grade caulk that is paintable. Allow the caulk to cure completely according to the manufacturer’s instructions before painting. A properly caulked surface creates a weather-resistant barrier, protecting your home from the elements.
Priming the Wood Siding
Priming is essential for ensuring proper paint adhesion and providing a uniform surface for the final coat. Primer acts as a bonding agent, helping the paint stick to the wood more effectively. It also helps to seal the wood, preventing moisture absorption and reducing the chances of paint failure. Choose a primer specifically designed for exterior wood surfaces. Apply the primer evenly using a brush, roller, or sprayer, ensuring complete coverage. Allow the primer to dry completely before applying the final coat of paint. Proper priming significantly contributes to the longevity and aesthetic quality of the final paint job.
Painting Wood Siding
Painting your wood siding not only enhances its aesthetic appeal but also provides crucial protection against the elements. Choosing the right paint and applying it correctly are key to a long-lasting, beautiful finish. This section will guide you through the process, from selecting the appropriate paint to ensuring a professional-looking result.
Suitable Paint Types for Wood Siding
The choice of paint significantly impacts the longevity and appearance of your siding. Several factors, including durability, weather resistance, and desired aesthetic, should guide your selection. The following table summarizes the characteristics of common paint types:
| Paint Type | Durability | Weather Resistance | Appearance |
|---|---|---|---|
| Acrylic Latex | Good to Excellent (depending on quality) | Excellent; resists moisture and UV damage | Wide range of colors and sheens available; typically a smooth finish |
| Oil-Based Alkyd | Excellent; very durable and long-lasting | Excellent; provides a tough, protective barrier | Durable, glossy finish; slower drying time than latex |
| 100% Acrylic | Excellent; highly durable and flexible | Excellent; superior resistance to fading and cracking | Variety of sheens; often chosen for its breathability and resistance to mildew |
| Solid Stain | Good; offers some protection | Good; protects against moisture and UV rays | Opaque finish; hides wood grain completely |
| Semi-Transparent Stain | Moderate; less protection than solid stain or paint | Moderate; allows some wood grain to show through | Allows wood grain to show through; offers color enhancement |
Applying Paint to Wood Siding
Proper application techniques are vital for achieving even coverage and minimizing drips. Begin by thoroughly cleaning the siding to remove dirt, mildew, and loose paint. Use a high-quality brush or sprayer for even application. For best results, apply thin, even coats, allowing each coat to dry completely before applying the next. Work in small sections, ensuring complete coverage before moving on. Overlapping each stroke slightly will prevent streaking. A back-and-forth motion is recommended, followed by a light vertical stroke to smooth out any brush marks. For sprayers, maintain a consistent distance from the surface and use a slow, even motion.
Ventilation and Safety Precautions
Adequate ventilation is crucial when painting, especially when using oil-based paints or stains, due to the release of volatile organic compounds (VOCs). Work in a well-ventilated area, preferably outdoors on a day with little wind. Always wear appropriate safety gear, including gloves, eye protection, and a respirator, especially when working with paints or stains containing VOCs. Follow the manufacturer’s instructions carefully, paying attention to drying times and cleanup procedures. Dispose of paint cans and other waste materials responsibly, according to local regulations. Remember to protect surrounding areas, like landscaping and windows, with drop cloths or painter’s tape.
Maintaining Painted Wood Siding
Keeping your freshly painted wood siding looking its best requires a bit of ongoing care. Regular maintenance not only enhances the aesthetic appeal of your home but also significantly extends the life of the paint job, saving you money and hassle in the long run. Proper maintenance prevents premature deterioration and keeps your siding looking vibrant for years to come.
Regular cleaning and occasional repainting are crucial for preserving your investment. The frequency of these tasks depends largely on your climate, the type of paint used, and the amount of exposure to the elements. Harsh weather conditions, such as intense sun, heavy rain, and frequent temperature fluctuations, will naturally accelerate the deterioration of paint and siding. Similarly, oil-based paints tend to last longer than water-based paints, but both require diligent maintenance.
Cleaning Painted Wood Siding
Cleaning your wood siding removes dirt, mildew, and other contaminants that can degrade the paint and promote premature wear. A simple pressure washing (using a low-pressure setting to avoid damaging the wood) once or twice a year, depending on environmental factors, is usually sufficient. For stubborn mildew or algae, a solution of mild bleach and water can be applied, but always test a small inconspicuous area first to ensure it doesn’t damage the paint. After applying any cleaning solution, thoroughly rinse the siding with clean water. Remember to protect surrounding landscaping from the cleaning solutions.
Repainting Frequency and Considerations
The lifespan of a paint job on wood siding can vary greatly depending on several factors. High-quality paints and proper surface preparation can extend the life of the paint to 10-15 years, or even longer in milder climates. However, in harsher environments, repainting might be necessary every 5-7 years. Signs that it’s time for a repaint include fading, peeling, cracking, or significant discoloration. Before repainting, carefully assess the condition of the wood siding itself. If the wood is severely damaged, repairs should be made before repainting.
Preventative Maintenance Schedule for Painted Wood Siding
Regular maintenance is key to prolonging the life of your painted wood siding. Here’s a suggested preventative maintenance schedule:
- Annual Inspection: Inspect your siding at least once a year, preferably in spring or fall, looking for any signs of damage, such as cracks, peeling paint, or wood rot. Note any areas needing attention.
- Spring Cleaning: Clean your siding in the spring to remove winter grime and mildew buildup. A pressure washer with a low-pressure setting works well for this task. Always test on a small area first.
- Mid-Summer Check: Check for any new damage or signs of wear and tear, especially after severe weather events.
- Fall Cleaning: Another cleaning in the fall helps remove debris that might accumulate throughout the year and potentially damage the paint during winter months. A thorough cleaning removes pollutants and prepares the surface for winter.
- Repainting: Repaint your siding every 5-7 years (or sooner if necessary) to maintain its appearance and protect it from the elements. The frequency will depend on your climate and the type of paint used.
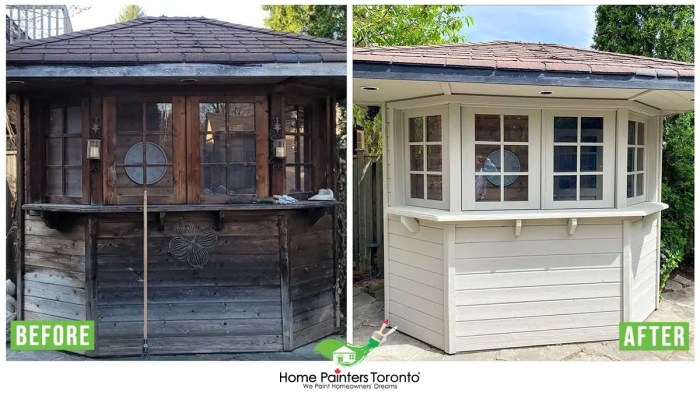
Final Review: Wood Siding Repair And Painting
Source: homepainterstoronto.com
Revitalizing your wood siding through repair and painting isn’t just about aesthetics; it’s about protecting your home’s structure and increasing its value. By following the steps outlined in this guide, you’ll be well-equipped to tackle this project with confidence. Remember, proper preparation is key to a successful outcome, so take your time, and don’t hesitate to seek professional help if you encounter any particularly challenging issues. With a little effort and the right techniques, your home’s exterior will shine for years to come!
Commonly Asked Questions
Can I paint wood siding in cold weather?
Generally, no. Most paints require temperatures above 50°F (10°C) for proper adhesion and drying. Check your paint’s specific instructions.
How often should I repaint my wood siding?
This depends on the paint type, climate, and sun exposure. High-quality paints can last 5-10 years, but regular inspections are recommended.
What’s the best way to clean wood siding before painting?
A pressure washer is effective, but use a low pressure setting to avoid damaging the wood. Follow up with a scrub brush and appropriate cleaner.
What type of primer is best for wood siding?
Oil-based primers offer superior adhesion and stain blocking, especially on bare wood or heavily weathered surfaces. However, water-based primers are easier to clean up.
How do I prevent future wood siding damage?
Regular inspections, prompt repairs, and proper gutter maintenance to prevent water damage are key. Consider using insect repellents if needed.
Comments are closed.